Follow Me On Social Media!

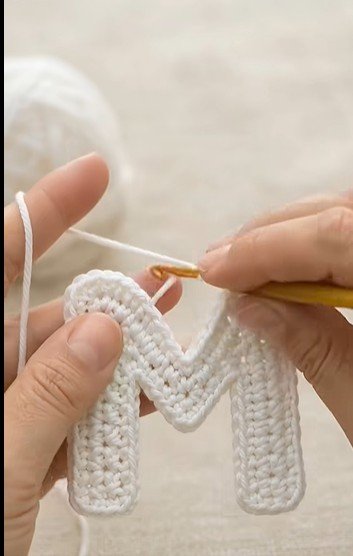
A handmade crochet letter M is a lovely starting point for personalized decorations, gift tags, and stitched names. The cream yarn in the reference photo highlights the simple texture and the recognizable outline: two upright legs joined by a shallow V in the middle.
This tutorial offers an original, beginner-friendly construction using four crocheted strips sewn together. It is inspired by the photographed letter, rather than a transcription of the pictured maker's pattern. The photo alone does not reveal the original stitch counts, yarn size, or construction method. This written design uses visible seams and creates its own version of the same letter shape.
↓ Jump to Pattern · Materials · Tips for Success · FAQs
How This Letter Is Made
Make two matching vertical strips for the outer legs, then two shorter strips for the inner diagonals. Arrange all four pieces flat, sew their joins, and block the finished letter. This approach lets you check the outline before sewing and adjust the diagonal length to suit your own gauge.
You only need chain stitches, single crochet, and simple sewing. There are no complicated increases or decreases in the strips. The most important part is keeping a consistent width and arranging the joins neatly.
Pattern Information
| Skill level | Confident beginner |
|---|---|
| Estimated time | 2–4 hours, plus blocking; varies with experience |
| Hook | 3 mm, adjusted for gauge |
| Yarn | Smooth DK cotton, approximately 20–30 g per layer |
| Finished size | About 10 cm tall at the stated gauge; width depends on assembly |
| Construction | Two uprights and two diagonals, sewn into a flat letter |
| Terminology | US crochet terms |
| Pattern | Free written instructions |
Pattern note: This is an original photo-inspired design, not the pictured maker's exact instructions. It has not been physically sample-tested; dimensions, quantities, and completion times are estimates. Check gauge and construction before committing to a finished project.
Materials
- Approximately 20–30 g smooth DK-weight cotton yarn in cream or another color
- A 3 mm crochet hook, or a size that gives a firm but flexible fabric
- A tapestry needle and scissors
- A ruler, stitch markers, and a blocking mat
Yarn use and finished measurements are estimates. Different cotton yarns labeled DK can vary substantially. Make a small sample if the finished size matters, and use the same hook and yarn for every strip.
Abbreviations and Pattern Notes
- ch: chain
- sc: single crochet
- st/sts: stitch/stitches
- RS: right side
UK readers should note that US single crochet is UK double crochet. The turning chain does not count as a stitch. Work through both loops of each stitch unless stated otherwise.
Gauge, Dimensions and Construction
A useful starting gauge is approximately 20 sc and 24 rows per 10 cm. At that gauge, each five-stitch strip is about 2.5 cm wide and the vertical legs are about 10 cm tall. The assembled letter will be wider than it is tall depending on the angle of the diagonals and the overlap at the joins.
These are planning measurements, not a guarantee of a tested finished size. Lay out the pieces as you work. If your diagonal strips do not meet comfortably, add or remove rows before fastening off.
Before You Start
For a base gauge reference, work a single-crochet swatch at least 24 stitches wide and 28 rows high. Aim for approximately 20 sc and 24 rows per 10 × 10 cm after gentle blocking, measuring away from the edges. Use the same yarn and hook for matching pieces. Turning ch 1 does not count as a stitch unless stated otherwise.
Written Crochet Letter M Pattern
Vertical Legs — Make Two
- Ch 6.
- Row 1: Sc in the second chain from the hook and in each remaining chain. You have 5 sc.
- Rows 2–24: Ch 1, turn, sc in each of the 5 stitches. Keep 5 sc in every row.
- Fasten off, leaving a tail of about 30 cm for joining.
Compare the two legs before moving on. They should have the same row count and similar length. If one is noticeably longer, check your stitch count and tension rather than relying on blocking to correct a large difference.
Inner Diagonals — Make Two
- Ch 6.
- Row 1: Sc in the second chain from the hook and each remaining chain: 5 sc.
- Rows 2–16: Ch 1, turn, sc in each stitch: 5 sc.
- Before fastening off the second strip, arrange both diagonals between the vertical legs. Add or remove rows if your gauge requires it.
- Fasten off with long sewing tails.
Arrange the Letter
Place the vertical legs parallel on a flat surface. Their lower ends should line up. Position one diagonal from the upper inside corner of the left leg down toward the middle of the letter. Place the second diagonal from that central meeting point up toward the upper inside corner of the right leg.
The center V should stop above the bottom of the legs. Leave enough open space beneath it to make the M easy to read. Slightly overlap the strip ends to create secure joins, then pin everything in position.
Do not stretch a short diagonal to force it into place. That pulls the outer legs inward and can distort the finished letter. Adjust the row count while the end is still accessible instead.
Sew the Joins
- Use a yarn tail and tapestry needle to sew the left diagonal to the upper inside area of the left leg.
- Repeat for the right diagonal and right leg.
- Join the lower ends of the diagonals to form the central V.
- Catch several stitches across each overlap rather than anchoring everything through one stitch.
- Check the letter from the front, then secure and weave in the tails on the back.
Keep sewing tension gentle. Tight stitches can create puckers and narrow the letter at the shoulders. Flat seams are more useful here than hidden but bulky knots.
Blocking and Finishing
Follow the yarn label when dampening the letter. Pin it flat with the two legs straight and the V centered, then allow it to dry completely. Avoid pulling aggressively on the corners.
This simple version has squared strip ends. If you prefer a softer outline, use the needle to ease the corner stitches inward slightly while weaving in a tail. Do not promise a perfectly seamless or rounded result from this rectangular construction; the joined style is part of the design.
Common Problems
The Strips Become Narrower
Count five stitches at the end of every row. The last stitch is easy to miss, especially near the turning chain. Mark the first and last stitches until the row edges become familiar.
The Letter Will Not Lie Flat
Check whether the diagonals were stretched or the seams sewn too tightly. Undoing one join and repositioning it can help more than strong blocking. The pieces should lie flat before they are sewn.
The Center Looks Too Thick
Reduce the overlap at the V while still sewing across enough fabric to hold securely. Use the same yarn for sewing and avoid winding several extra layers around the join.
Care and Uses
Wash according to the yarn label and reshape while damp. Lay flat to dry. Before attaching it to a bag, sew across several stitches so the weight is distributed rather than hanging from a single loop.
This is a decorative craft project. If using it around young children, avoid detachable beads, long cords, and loose hardware. A letter sewn flat onto a supervised decorative item has different requirements from a toy intended for play.
Optional Double-Layer Letter
Make a second complete M using the same final strip counts and layout. Block the letters separately, let them dry, then place them wrong sides together. Whipstitch around all exposed edges, including both sides of the central V and the opening below it.
Match corresponding stitches and row ends without gathering the fabric. Leave the letter unstuffed for a flat finish. A double layer adds body but does not make the letter rigid.
Tips for Success
- Mark the first and last stitch of every strip row. All strip rows contain 5 sc.
- Compare matching pieces before fastening off the diagonals.
- Pin the complete M before sewing so the two shoulders are level.
- Keep the center V above the bottom edge and leave open space beneath it.
- Use several small sewing stitches instead of wrapping yarn around a join.
Common Mistakes to Avoid
Counting the turning chain: The ch 1 is not a stitch. Work only into the five single crochets.
Stretching the diagonals: A short diagonal pulls the upright inward. Add rows equally to both diagonals instead.
Sewing bulky overlaps: Keep overlaps small and flat, then spread the anchoring stitches across several fabric stitches.
Blocking a tight seam aggressively: Undo and resew a puckered join before blocking.
Ways to Customize This Pattern
Try a contrasting color for one diagonal, embroider small dots along the legs, or attach the finished M to a fabric pennant. A smooth cotton yarn shows the stitch texture clearly, while fuzzy yarn makes the outline less distinct.
For a larger letter, increase both strip width and length in proportion. For example, a wider strip also needs longer diagonals and more spacing between the legs. Changing only the foundation chain can make the M too heavy through the middle.
Frequently Asked Questions
Can I Make It Without Sewing?
Not using this exact construction. A one-piece letter requires a different shaping pattern. This tutorial deliberately uses separate strips so the outline can be adjusted before joining.
Can I Use Leftover Yarn?
Yes, if all the pieces use yarn of similar thickness. Mixing very different weights can make one leg stiffer or larger than the other.
Can It Become a Keychain?
A single-layer M is flexible. For a sturdier charm, make two matching letters and sew them back to back, securing a short hanging loop across several stitches. Check the joins regularly if the letter will be carried on a bag.
< class="ct-module-title">
Trending now