
Follow Me On Social Media!
Breakfast Protein Biscuits

Introduction
Here is a question that challenges one of the most deeply ingrained myths in modern nutrition: what if the most important thing you could do for your energy, metabolism, and appetite control before 9 a.m. had nothing to do with a smoothie, overnight oats, or a carefully assembled açaí bowl — and everything to do with a warm, golden, pull-apart biscuit fresh from the oven? A 2024 study published in the American Journal of Clinical Nutrition found that breakfast meals containing at least 25–30 grams of protein reduced mid-morning hunger hormones by up to 65% compared to high-carbohydrate, low-protein breakfasts of identical calorie counts. These breakfast protein biscuits were built directly around that finding.
The standard biscuit — beloved, buttery, and entirely defensible as a weekend treat — delivers somewhere between 3 and 5 grams of protein per serving and is primarily a vehicle for refined flour and saturated fat. These breakfast protein biscuits keep everything that makes a biscuit worth eating: the flaky, tender layers, the golden exterior, the warm, slightly salty, subtly rich flavor — and engineer every ingredient to significantly elevate the protein content without sacrificing a single point of texture or taste. The result is a biscuit that delivers 18–22 grams of protein per serving depending on your additions, holds you comfortably through the morning, and is genuinely, unambiguously delicious on its own terms.
According to market research by Mintel, high-protein breakfast products represent the single fastest-growing segment of the breakfast food category globally, with a 38% increase in new product launches between 2021 and 2024. This recipe gives you a homemade version that outperforms every packaged alternative on taste, ingredient quality, and nutritional value. Let’s bake.
Ingredients List
For the Protein Biscuit Base
- 2 cups (240g) all-purpose flour (sub: whole wheat flour for additional fiber, or a 1:1 gluten-free flour blend)
- ½ cup (55g) unflavored or vanilla whey protein powder (sub: plant-based protein powder — pea or brown rice — for dairy-free)
- 1 tbsp baking powder
- ½ tsp baking soda
- 1 tsp fine sea salt
- 1 tsp garlic powder (optional — adds a savory depth that complements the cheese beautifully)
- ½ tsp smoked paprika (optional)
- 6 tbsp (85g) unsalted butter, very cold and cut into small cubes (sub: cold coconut oil or vegan butter)
- ¾ cup (180ml) full-fat buttermilk, very cold (sub: whole milk + 1 tbsp lemon juice, rested 5 minutes)
- 1 large egg, cold
For the Protein Boost Additions (Choose One or Combine)
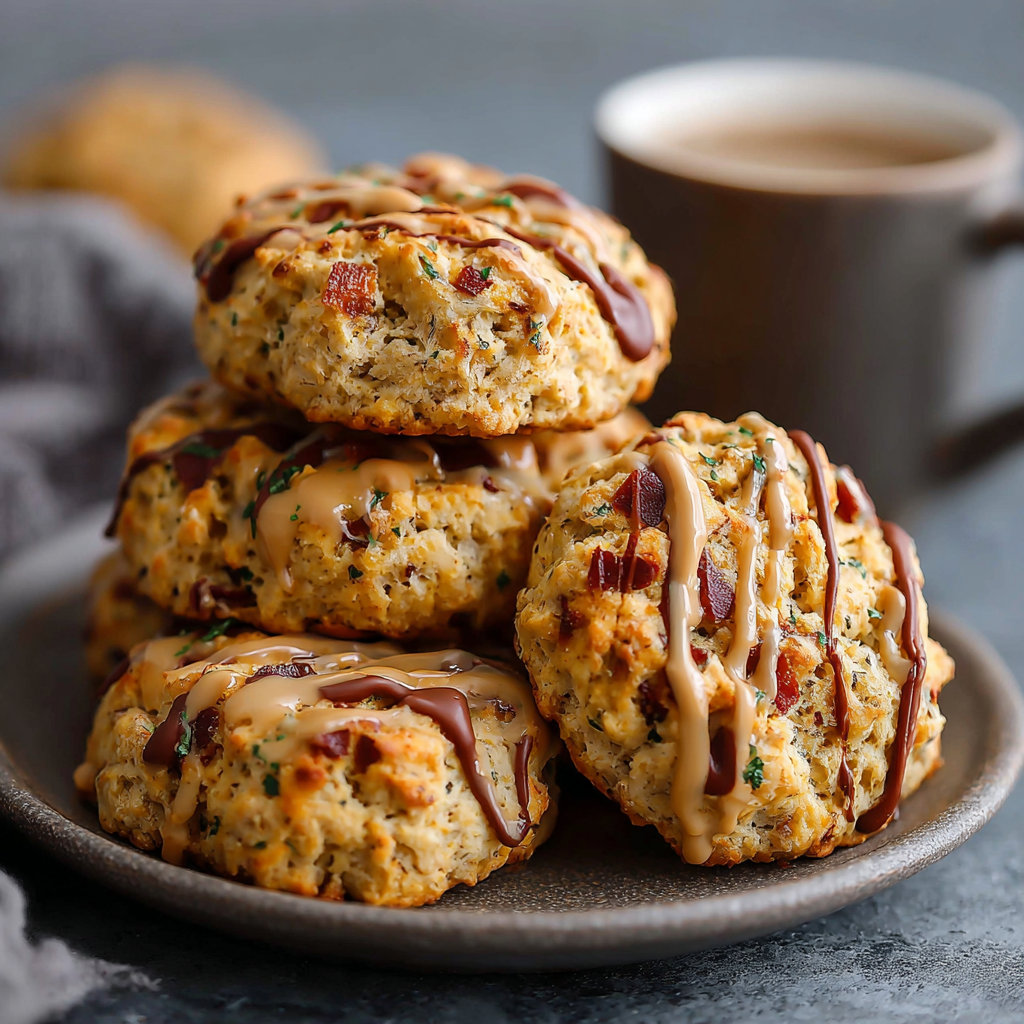
- 1 cup (115g) sharp cheddar cheese, freshly grated (adds approximately 7g protein per serving)
- ½ cup (120g) full-fat cottage cheese, well-drained (adds approximately 6g protein per serving and creates an extraordinary internal texture)
- ½ cup (60g) crumbled cooked turkey sausage or bacon, cooled (adds approximately 8g protein per serving)
- ¼ cup (60g) plain Greek yogurt in addition to the buttermilk, reducing buttermilk by the same amount
For the Topping
- 2 tbsp unsalted butter, melted
- ½ tsp garlic powder
- 1 tbsp fresh chives or flat-leaf parsley, finely chopped
- Flaky sea salt, for finishing (Maldon or fleur de sel)
Timing
- Prep Time: 15 minutes
- Chilling Time: 10 minutes (optional but recommended)
- Bake Time: 14–17 minutes
- Total Time: 30–40 minutes
The average drive-through breakfast run takes 12–18 minutes of travel and wait time, costs between $6 and $12 per person, and delivers a product with ambiguous ingredients and minimal protein. This recipe, from cold butter to warm biscuit on the table, takes 30–40 minutes, costs approximately $1.20–$1.80 per biscuit, and delivers a measurably superior nutritional outcome. The math, across every dimension that matters, favors the oven.
Step-by-Step Instructions
Step 1: Prepare Your Ingredients and Workspace
Preheat the oven to 425°F (220°C) and line a large baking sheet with parchment paper. The high temperature is deliberate and critical — it creates the rapid rise and steam that produces the signature flaky, layered interior and golden exterior that defines a great biscuit. A lower temperature produces a paler, denser, less texturally interesting result.
Measure all ingredients before beginning. Cold temperatures are the organizing principle of excellent biscuit-making — every dairy component, every piece of butter, and the egg should remain refrigerated until the precise moment they are needed. Warm fat melts into the flour rather than creating steam pockets during baking, and it is those steam pockets that produce the flaky, pull-apart layers the biscuit is known for.
Grate the cheddar on the large holes of a box grater and return it to the refrigerator. If using cottage cheese, drain it in a fine mesh sieve for 5 minutes and press gently with a spoon to remove excess moisture before use. If using cooked meat, ensure it is completely cooled before incorporating.
Step 2: Combine the Dry Ingredients
In a large mixing bowl, whisk together the all-purpose flour, protein powder, baking powder, baking soda, salt, garlic powder, and smoked paprika until completely and evenly blended. The protein powder integrates directly into the dry ingredient base and behaves similarly to flour during baking — it adds structure, binds moisture, and contributes protein without creating a detectably different texture when the right variety is used.
Key tip: Not all protein powders behave identically in baking. Whey protein isolate produces the most neutral, flour-like result. Casein protein can make biscuits denser and slightly drier. Plant-based protein powders, particularly pea protein, produce excellent results with a slightly earthier flavor that pairs well with savory additions like cheese and herbs. Avoid using flavored protein powders with artificial sweeteners — they create off-flavors in savory baked goods that no amount of cheese or garlic can fully mask.
Step 3: Cut the Cold Butter Into the Flour
Add the cold, cubed butter to the flour mixture. Using your fingertips, a pastry cutter, or two forks, work the butter into the flour by pressing and smearing each cube flat, then breaking it into smaller pieces. The goal is to reach a texture that resembles coarse, uneven crumbs — some pieces the size of small peas, some slightly larger, with no piece larger than a almond. The variation in butter piece size is intentional and desirable: larger pieces create bigger steam pockets and therefore larger, more dramatic flaky layers, while smaller pieces produce a more even, tender crumb.
Work quickly and with a light touch — the heat from your hands is the enemy at this stage. If at any point the butter begins to feel soft or greasy, place the entire bowl in the freezer for 5 minutes before continuing.
Key tip: The butter cutting stage is where the texture of every biscuit is determined. If the butter melts fully into the dough before baking, the steam pockets never form and the biscuit will be dense and bread-like rather than flaky and layered. Cold butter, worked quickly, is the technical foundation of the entire recipe.
Step 4: Add the Protein Boost Components
Add the grated cheddar, drained cottage cheese, or cooked crumbled meat — whichever additions you have chosen — directly to the butter-flour mixture and toss briefly with a fork to distribute evenly throughout the dry ingredients. Coating the additions in the dry mixture before the liquid is added prevents them from clumping together and ensures even distribution through every biscuit.
Step 5: Add the Liquid and Bring the Dough Together
In a small bowl or measuring jug, whisk together the cold buttermilk and the cold egg until combined. Make a well in the center of the flour mixture and pour the buttermilk-egg mixture in all at once. Using a fork or your hands, fold and stir the mixture with minimal strokes until it just barely comes together into a shaggy, rough, sticky dough. Visible streaks of flour are acceptable and even desirable at this stage — the dough will come together fully during folding.
Do not overmix. This is the most important instruction in the entire recipe and the one most frequently disregarded. Overmixed biscuit dough develops gluten, which produces a tough, dense, chewy interior rather than a tender, flaky one. Stir until just combined — 10 to 15 strokes maximum — then stop completely.
Key tip: The dough will look rough, sticky, and almost alarmingly unfinished. This is exactly correct. A smooth, cohesive biscuit dough is an over-worked biscuit dough. Embrace the shaggy appearance.
Step 6: Fold and Shape the Dough
Turn the dough out onto a lightly floured surface. Using a bench scraper or your hands, gently bring the dough together into a rough rectangle approximately 2cm (¾ inch) thick. Fold the dough in half, rotate 90 degrees, and gently flatten back to 2cm thickness. Repeat this folding process 4–5 times total — this is the lamination technique that creates distinct, visible, flaky layers in the finished biscuit without developing the gluten structure that would toughen it.
After the final fold, press the dough to a consistent 2.5cm (1-inch) thickness. Use a sharp 7–8cm (3-inch) round biscuit cutter or a sharp knife to cut the biscuits. Press the cutter straight down with firm, decisive pressure — do not twist. Twisting seals the edges of the dough and prevents the biscuit from rising straight and tall during baking. Cut as many biscuits as possible from the first pressing, then gently re-form the scraps and cut the remaining biscuits — though these second-cut biscuits will be slightly less flaky than the first.
Step 7: Chill Briefly and Bake
Place the cut biscuits on the prepared baking sheet with their sides just touching — biscuits baked in close proximity support each other’s upward rise rather than spreading outward. For the flakiest, tallest possible result, refrigerate the entire tray for 10 minutes before baking. This brief chill resolidifies any butter that has begun to soften during the shaping process and resets the temperature differential that drives steam formation in the oven.
Bake at 425°F (220°C) for 14–17 minutes until the tops are deeply golden and the sides are set and lightly browned. Avoid opening the oven door before the 12-minute mark.
Step 8: Apply the Garlic Herb Butter and Serve
While the biscuits are baking, stir together the melted butter, garlic powder, and fresh chives in a small bowl. The moment the biscuits come out of the oven — while they are still at their hottest — brush the tops generously with the garlic herb butter. The residual heat from the biscuits draws the butter into the surface rather than sitting on top of it, infusing the crust with garlic and herb flavor that penetrates into the outer layers. Finish with a pinch of flaky sea salt over each biscuit. Serve immediately.
Nutritional Information
Per serving — based on 1 biscuit from a batch of 10, including cheddar and cottage cheese additions, with garlic herb butter topping. Values are approximate.
| Nutrient | Per Serving | % Daily Value* |
|---|---|---|
| Calories | 285 kcal | 14% |
| Total Fat | 14g | 18% |
| Saturated Fat | 8g | 40% |
| Total Carbohydrates | 24g | 9% |
| Total Sugar | 2g | — |
| Protein | 20g | 40% |
| Dietary Fiber | 1g | 4% |
| Sodium | 480mg | 21% |
| Calcium | 22% DV | 22% |
| Iron | 12% DV | 12% |
| Vitamin B12 | 18% DV | 18% |
| Phosphorus | 25% DV | 25% |
*Based on a standard 2,000-calorie daily diet. Values vary significantly based on which protein additions are used and the specific protein powder brand.
At 20 grams of protein per biscuit and 285 calories, these breakfast protein biscuits deliver a protein density of approximately 70 milligrams of protein per calorie — a ratio that compares favorably to most commercially available protein breakfast bars and significantly outperforms any conventional biscuit recipe on the market.
Healthier Alternatives for the Recipe
Lower carbohydrate: Replace half the all-purpose flour with almond flour. The texture will be slightly more tender and crumbly, and the biscuit will rise less dramatically, but the fat and protein content both increase meaningfully while the carbohydrate count drops by approximately 35% per serving.
Higher fiber: Substitute whole wheat flour for all-purpose flour in a 1:1 ratio, and add 2 tablespoons of ground flaxseed to the dry ingredients. Whole wheat flour adds 3 additional grams of fiber per serving along with a pleasantly nutty, slightly earthy flavor that pairs beautifully with the savory additions.
Dairy-free: Use cold coconut oil or vegan butter in place of dairy butter, plant-based protein powder instead of whey, unsweetened oat milk with 1 tablespoon of apple cider vinegar in place of buttermilk, and a vegan cheddar alternative. Omit cottage cheese and replace with an additional 2 tablespoons of plant-based yogurt.
Egg-free: Replace the single egg with 1 tablespoon of ground flaxseed mixed with 3 tablespoons of cold water, rested for 5 minutes until it forms a gel. This flax egg provides sufficient binding without altering the flavor of the biscuit in any detectable way.
Lower sodium: Reduce the added salt by half and omit the garlic powder, replacing both with a herb blend — dried rosemary, thyme, and chives — that adds flavor complexity without sodium. Use an unsalted protein powder and an unsalted butter throughout.
Anti-inflammatory addition: Add 1 teaspoon of ground turmeric and ½ teaspoon of ground ginger to the dry ingredient blend. Both integrate seamlessly into the savory flavor profile, and turmeric gives the biscuit interior a warm golden hue that makes the finished product look as vibrant as it is nutritious.
Serving Suggestions
Classic breakfast sandwich: Split the warm biscuit horizontally and fill with a folded fried egg, a slice of sharp cheddar, and two slices of turkey bacon or a plant-based sausage patty. This assembly pushes the total protein count per serving toward 35–40 grams and creates a complete, hand-held breakfast that competes directly — and favorably — with any fast food breakfast sandwich by every measurable metric.
With scrambled eggs and hot sauce: Serve two biscuits alongside a generous plate of soft-scrambled eggs, a spoonful of salsa or pico de gallo, sliced avocado, and a liberal application of your preferred hot sauce. The contrast between the flaky, savory biscuit and the creamy, spiced eggs is one of the most satisfying breakfast combinations imaginable.
Honey and butter: For a simpler, sweeter approach, split the biscuit while still warm and add a thin spread of salted butter and a drizzle of raw honey. The interplay of the savory, garlicky crust with the sweet honey and rich butter is a classic Southern-inspired flavor combination that requires no further elaboration to justify.
Meal prep breakfast box: Bake a full batch, allow to cool completely, and split and fill each biscuit with a pre-cooked egg patty, a slice of cheese, and a piece of turkey sausage. Wrap individually in parchment paper and refrigerate for up to 4 days or freeze for up to 1 month. Reheat in the air fryer at 350°F (175°C) for 4–5 minutes for a genuinely exceptional ready-made breakfast that requires nothing from you on a busy morning except the ability to push a button.
Biscuits and gravy — high-protein style: Make a simple sausage gravy using turkey or chicken sausage, whole milk or oat milk, flour, and black pepper. Ladle generously over split warm biscuits. This classic Southern comfort dish, reimagined with leaner protein and high-protein biscuits, becomes a nutritionally defensible weekend brunch centerpiece.
Afternoon snack with soup: Serve the biscuits alongside a bowl of roasted tomato soup, white bean and kale soup, or a hearty chicken broth. The biscuits perform exactly as well in a savory soup-accompaniment role as they do at breakfast, making them a genuinely versatile recipe that earns a place in your weekly baking rotation well beyond the morning meal.
Common Mistakes to Avoid
Using warm or room temperature butter. Warm butter melts into the flour and fat coats every flour particle, producing a mealy, dense, cookie-like texture rather than distinct flaky layers. The butter must remain in visible, distinct pieces throughout the mixing process — these pieces are what create steam during baking and produce the layers. Keep everything cold, work quickly, and return the bowl to the freezer without hesitation if the butter begins to soften.
Overmixing the dough after adding liquid. The gluten network in biscuit dough develops rapidly once liquid contacts flour. Excessive mixing aligns and strengthens this network, producing a biscuit with the texture of a dense roll rather than a tender, flaky quick bread. Count your strokes — 12 to 15 folds after the liquid is added is sufficient. The dough should look rough and barely held together when it goes to the floured surface.
Twisting the biscuit cutter. A twisted cutter compresses and seals the layered edges of the dough, preventing the biscuit from rising vertically during baking and producing a squat, dense result rather than a tall, dramatic rise. Press firmly, straight down, and lift cleanly. A sharp cutter — not a glass, which is too blunt — is also important for the same reason.
Using a protein powder with strong artificial flavoring. Vanilla-flavored whey protein, particularly varieties sweetened with sucralose or acesulfame potassium, creates a subtly sweet, artificial-tasting undercurrent in a savory biscuit that clashes with the cheese, garlic, and herb components. Use unflavored whey protein isolate or a lightly flavored variety for savory applications. The protein content is identical — the flavor outcome is not.
Skipping the high oven temperature. Biscuits baked at 350°F (175°C) are pale, flat, and dense. The 425°F (220°C) environment creates rapid steam production from the cold butter and buttermilk, which simultaneously produces the rise, the flake, and the golden crust. Do not reduce the temperature under the mistaken impression that lower heat will prevent burning — the short baking time at high heat is precisely calibrated for the correct outcome.
Re-rolling scraps too many times. Each re-roll develops additional gluten and warms the remaining butter further. Cut the maximum number of biscuits from the first pressing, accept that the second-generation biscuits will be slightly less flaky, and stop there. Third and fourth re-rolls produce biscuits that are noticeably tougher and less desirable — they are better baked as a smaller, irregular rough-cut biscuit than re-rolled into submission.
Storing Tips for the Recipe
Room temperature: Freshly baked breakfast protein biscuits can be stored in an airtight container at room temperature for up to 2 days. Place a sheet of paper towel in the container to absorb excess moisture and maintain the exterior texture. After 2 days, refrigeration is recommended due to the dairy and protein content.
Refrigerator: Store in an airtight container for up to 5 days. The texture changes slightly after the first day as the layers compress and the exterior softens, but the flavor actually deepens and becomes more cohesive. Reheat in a toaster oven or air fryer at 350°F (175°C) for 3–4 minutes to restore much of the original crust.
Freezer — baked: Allow biscuits to cool completely, then wrap each one individually in plastic wrap before placing in a freezer-safe zip-lock bag. Freeze for up to 3 months. Reheat from frozen in the oven at 350°F (175°C) for 12–15 minutes or in the air fryer at 325°F (160°C) for 7–8 minutes until warmed through and the exterior is crispy once more.
Freezer — unbaked: Cut the biscuits and arrange on a parchment-lined baking sheet. Freeze until solid, approximately 2 hours, then transfer to a freezer bag. Bake directly from frozen at 425°F (220°C), adding 4–5 minutes to the standard baking time. Unbaked frozen biscuits produce a result that is virtually indistinguishable from fresh-baked — this method is ideal for anyone who wants freshly baked protein biscuits available at any moment with minimal effort.
Meal prep strategy: Bake a double batch every Sunday. Assemble 5 breakfast sandwiches immediately with pre-cooked egg patties and store them wrapped in the refrigerator. Keep the remaining 5 biscuits plain in a freezer bag for the following week. This two-week rotating system means a high-protein, homemade breakfast is available every single weekday morning with zero additional cooking required.
Conclusion
These breakfast protein biscuits prove that the gap between nutritious and genuinely delicious is smaller than the packaged food industry would have you believe. Flaky, golden, warmly spiced, and loaded with up to 22 grams of protein per biscuit — they outperform every drive-through and packaged alternative on every dimension that matters, and they come together in under 40 minutes from a handful of ingredients most kitchens already contain.
Ready to bake? Make a batch this weekend and share your results in the comments below — tell us which protein additions you chose, how you served them, and whether they held you through the morning as promised. Leave a review, share this guide with anyone who has ever claimed they don’t have time for a proper breakfast, and subscribe to our newsletter for more high-protein, flavor-first recipes delivered to your inbox every week. Your mornings are about to improve significantly.
FAQs
Can I use plant-based protein powder instead of whey? Yes, and it works very well in this recipe. Pea protein powder is the most reliable plant-based option for baking — it has a neutral, slightly earthy flavor that integrates naturally into savory biscuits and behaves similarly to whey in terms of binding and moisture absorption. Brown rice protein is a close second. Avoid soy protein concentrate in this application as it can produce a slightly beany flavor that becomes more pronounced during baking.
Why did my biscuits not rise properly? There are four common causes: expired baking powder, butter that was too warm, dough that was overmixed, or a biscuit cutter that was twisted during cutting. Check the expiration date on your baking powder first — it loses potency over time and is the most frequent culprit in flat biscuits. Test it by adding 1 teaspoon to ½ cup of hot water — it should bubble vigorously within seconds. If it does not, replace it before baking.
Can I make these biscuits sweet instead of savory? Absolutely. Replace the garlic powder and smoked paprika with 2 tablespoons of sugar, 1 teaspoon of cinnamon, and ¼ teaspoon of nutmeg. Use a vanilla-flavored whey protein powder. Replace the cheddar and cottage cheese with ½ cup of fresh blueberries or diced strawberries. Finish with a simple glaze of powdered sugar and milk instead of garlic herb butter. The biscuit base is versatile enough to support either direction with only minor modifications.
How do I get the biscuits to have distinct, visible layers? The lamination folding technique in Step 6 is responsible for visible layers — each fold creates an additional stratum of flour and butter that separates during baking as the butter produces steam. Ensure the butter is genuinely cold when it enters the oven, use the folding technique as described with 4–5 folds, and cut the biscuits without twisting. All three elements must be present simultaneously for dramatic, visible layering.
Can I make this recipe without a biscuit cutter? Yes. A sharp-edged drinking glass approximately 7–8cm (3 inches) in diameter works in a pinch, though a glass edge is less sharp than a proper cutter and may compress the edges slightly. Alternatively, cut the dough into squares using a sharp chef’s knife — square biscuits produce zero scrap, require no re-rolling, and bake identically to round ones. Many professional bakers prefer the square cut specifically for this reason.
Is this recipe suitable for children? It is an excellent option for children, with one modification: reduce or omit the garlic powder and smoked paprika for younger or more sensitive palates, and use a mild cheddar rather than sharp. The protein content makes these biscuits a genuinely nourishing breakfast option for school mornings, and their hand-held format makes them easy for children to eat independently. The unbaked freezer method is particularly practical for busy school-week mornings.