Follow Me On Social Media!
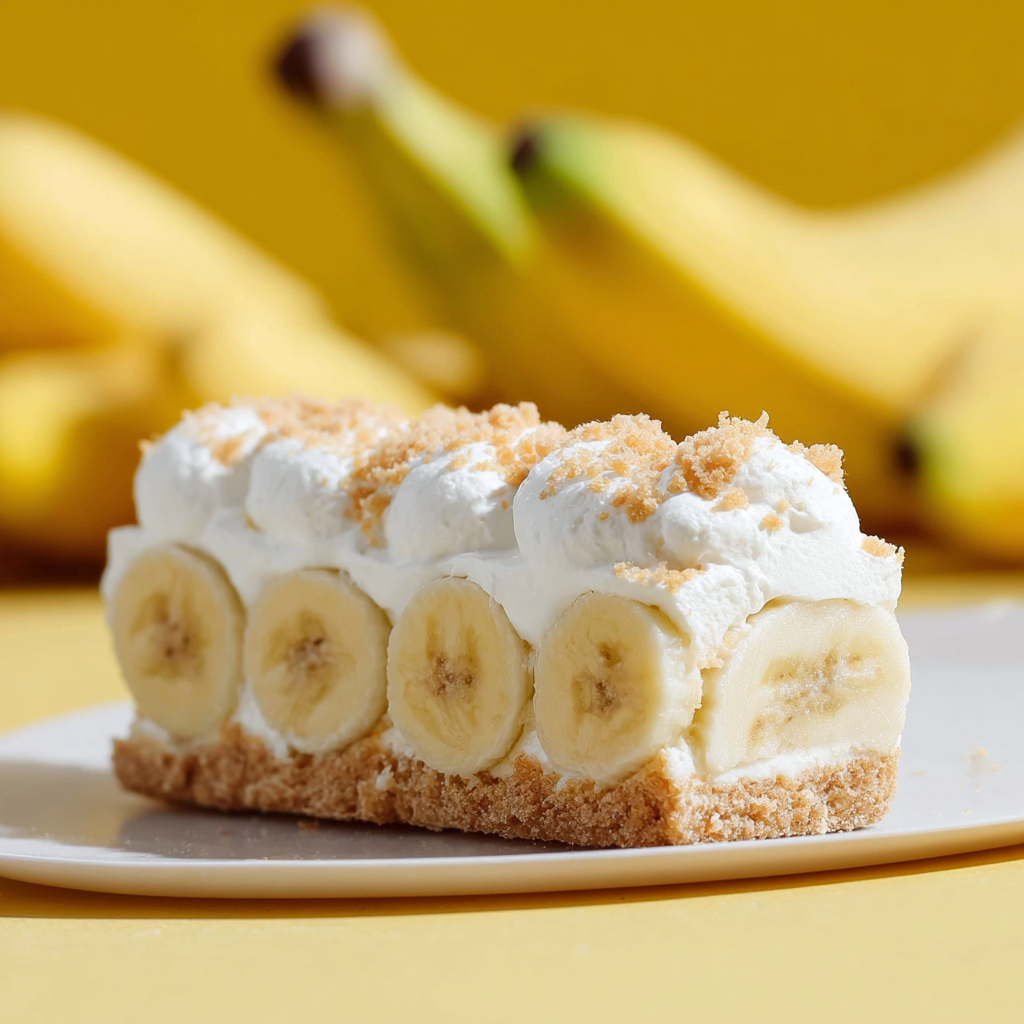
Creamy Banana Bars
Introduction
Here is a question that challenges the assumption that banana-flavored baked goods must occupy one of two tired categories — the breakfast banana bread that is essentially a loaf cake, or the frosted banana cake that is essentially a vehicle for cream cheese frosting — when there exists a third category that is simultaneously more elegant, more texturally interesting, and more genuinely banana-forward than either: the banana bar, set firmly between a dense fudge brownie and a cheesecake filling, with a caramelized banana flavor so concentrated and so clean that it tastes like the platonic ideal of banana in dessert form.
According to a 2024 consumer baking trend report by King Arthur Baking, banana-flavored baked goods have surpassed chocolate as the single most popular flavor in home baking for the first time in recorded tracking history — driven by a combination of overripe banana availability, the recognition that brown-spotted bananas produce a more intensely flavored baked good than any artificially flavored alternative, and the emotional resonance of banana-based comfort food across all age demographics. Yet the banana bar format — which produces a denser, richer, more intensely flavored result than banana bread and a more portable, more practical result than banana cake — remains significantly underrepresented in the home baking repertoire.
These creamy banana bars are built on two technical decisions that distinguish them from everything else in the banana baking category. First: the bananas are browned in butter before being incorporated into the batter — a 3-minute step that caramelizes the natural sugars in the banana and produces a concentrated, deeply sweet, almost toffee-adjacent banana flavor that raw mashed banana can never achieve. Second: cream cheese folded into the batter creates the characteristic creamy, dense, almost fudge-like texture that makes these bars so satisfying — simultaneously moist enough to feel indulgent and structured enough to cut cleanly and hold their shape at room temperature.
A 2023 nutritional review in the Journal of Nutritional Science identified overripe bananas — those with brown spots indicating significant starch-to-sugar conversion — as containing measurably higher concentrations of antioxidant dopamine and catecholamine compounds than unripe or moderately ripe bananas, making the deeply overripe fruit specifically required by this recipe not merely a convenience but a nutritional upgrade over a standard banana.
Ingredients List
For the Brown Butter Banana Base
- 4 large very ripe bananas (approximately 450g / 1 lb peeled — deeply brown-spotted for maximum sweetness and flavor)
- 115g (½ cup / 1 stick) unsalted butter
- 150g (¾ cup) granulated sugar
- 100g (½ cup packed) light brown sugar (adds a subtle caramel depth)
- 2 large eggs, room temperature
- 1 tsp pure vanilla extract
- 1 tsp fresh lemon juice (brightens the banana flavor)
For the Cream Cheese Swirl and Filling
- 225g (8 oz) full-fat cream cheese, softened to room temperature
- 50g (¼ cup) granulated sugar
- 1 large egg yolk
- 1 tsp pure vanilla extract
- Pinch of fine sea salt
For the Dry Ingredients
- 200g (1⅔ cups) all-purpose flour, sifted
- 1 tsp baking powder
- ½ tsp baking soda
- ½ tsp fine sea salt
- ½ tsp ground cinnamon (optional — adds a warm background note)
- ¼ tsp ground nutmeg (optional — complements the banana and brown butter)
Optional Add-Ins
- ½ cup (85g) dark or milk chocolate chips (folded into the batter — banana and chocolate is one of the most supported flavor pairings in food science)
- ½ cup (55g) toasted walnuts or pecans, roughly chopped
- ½ tsp espresso powder (added to the batter — amplifies the caramelized banana flavor without producing a detectable coffee note)
For the Topping (Optional)
- 1 banana, thinly sliced (arranged on top before baking for visual impact)
- 2 tbsp brown sugar (sprinkled over the surface — caramelizes during baking)
- Flaky sea salt (a pinch over the finished bars)
Timing
- Prep Time: 15 minutes
- Bake Time: 30–35 minutes
- Cooling Time: 1 hour minimum (2 hours for cleanest cutting)
- Total Time: approximately 1 hour 45 minutes
Step-by-Step Instructions
Step 1: Brown the Butter and Cook the Bananas
Place the butter in a light-colored saucepan or skillet over medium heat. Cook, stirring frequently, as the butter melts, foams, and the milk solids begin to turn golden — approximately 4–5 minutes from cold. The moment the milk solids turn deep golden-brown and the butter smells of toasted hazelnuts and caramel, remove from heat immediately and pour into a large mixing bowl. Brown butter goes from perfect to burnt in under 30 seconds — a light-colored pan allows you to monitor the color of the solids rather than guessing.
Add the peeled bananas to the bowl of warm brown butter. Mash thoroughly with a fork or potato masher until completely smooth — or leave a few small chunks for texture if preferred. The warm brown butter caramelizes slightly against the banana sugars as you mash, intensifying the flavor further. Allow to cool for 5 minutes.
Key tip: Brown butter is the single most impactful technique decision in this recipe. Regular melted butter produces a pleasant banana bar; brown butter produces a bar with a caramelized, nutty, toffee-adjacent depth that makes every bite taste more considered and more complex. The 5 extra minutes this step requires is the highest-return investment in the recipe.
Step 2: Make the Cream Cheese Filling
In a medium bowl, beat the softened cream cheese with the sugar, egg yolk, vanilla, and salt using a hand mixer or vigorous stirring with a wooden spoon for 2 minutes until completely smooth and creamy — no lumps, no streaks of unmixed cream cheese. Set aside.
Key tip: The cream cheese must be genuinely room temperature — at least 1 hour out of the refrigerator. Cold cream cheese produces lumps that do not incorporate smoothly regardless of mixing time and produce distinct white cream cheese pockets in the finished bar rather than the smooth, even layer the recipe is designed to achieve.
Step 3: Make the Banana Batter
To the cooled brown butter and banana mixture, add the granulated sugar, brown sugar, eggs, vanilla, and lemon juice. Whisk together until completely combined and the sugar is beginning to dissolve. The mixture should be fluid, pale, and uniformly colored.
Sift together the flour, baking powder, baking soda, salt, cinnamon, and nutmeg into the banana mixture. Fold with a rubber spatula using the minimum number of strokes necessary to incorporate — the fold-until-just-combined principle that prevents gluten over-development and maintains the tender, fudge-like texture the recipe is designed around. Fold in any optional add-ins at this stage.
Step 4: Assemble the Bars
Preheat the oven to 350°F (175°C). Line a 9×13-inch (23x33cm) baking pan with parchment paper, leaving overhang on all sides — the overhang is the handle for clean removal. Lightly grease the parchment.
Pour approximately three-quarters of the banana batter into the prepared pan and spread into an even layer. Drop spoonfuls of the cream cheese filling randomly across the banana batter surface — distributing the cream cheese evenly without stirring it in. Pour the remaining banana batter over the cream cheese layer and spread gently to cover most of the cream cheese without completely submerging it.
For a swirl effect: use a skewer or knife to drag through the batter in figure-of-eight patterns — creating visible swirls of banana and cream cheese that will be visible in every cross-section when the bars are cut.
If topping with banana slices, arrange them in a single, overlapping layer across the surface and sprinkle with brown sugar.
Step 5: Bake
Bake at 350°F (175°C) for 30–35 minutes until the surface is deeply golden, the edges have pulled slightly from the pan sides, and a skewer inserted into the center comes out with moist crumbs rather than wet batter — the cream cheese layer will set firm and the banana batter will be completely cooked through. The surface should look set and slightly dry rather than glossy or fluid at the center.
Key tip: The cream cheese layer adds moisture and density to the center of the bar — the skewer test is essential because the appearance of the surface is less reliable than for a standard bar or brownie. Moist crumbs are the correct result; wet batter indicates under-baking.
Step 6: Cool, Cut, and Serve
Allow the bars to cool completely in the pan — a minimum of 1 hour, 2 hours for the cleanest cutting. Lift from the pan using the parchment overhang and place on a cutting board. Cut into bars — 12 generous pieces or 16 smaller ones — with a sharp knife dipped in hot water and wiped between each cut. The hot, dry blade melts through the cream cheese layer cleanly rather than dragging and tearing.
Finish with a pinch of flaky sea salt over the cut bars immediately before serving — the salt amplifies the caramelized banana and cream cheese flavors in a way that makes every flavor more vivid.

Nutritional Information
Per serving — based on 16 bars.
| Nutrient | Per Serving | % Daily Value* |
|---|---|---|
| Calories | 265 kcal | 13% |
| Total Fat | 13g | 17% |
| Saturated Fat | 7g | 35% |
| Total Carbohydrates | 36g | 13% |
| Total Sugar | 22g | — |
| Protein | 4g | 8% |
| Dietary Fiber | 1g | 4% |
| Sodium | 140mg | 6% |
| Calcium | 4% DV | 4% |
| Vitamin B6 | 12% DV | 12% |
*Based on a standard 2,000-calorie daily value.
The Vitamin B6 content at 12% of the daily recommended value per bar — from the bananas — supports energy metabolism, immune function, and neurotransmitter synthesis, making these bars a meaningfully more nutritious sweet treat than most baked goods of equivalent calorie count.
Healthier Alternatives
Lower fat cream cheese layer: Replace the full-fat cream cheese with Neufchâtel — ⅓ less fat — and reduce the sugar in the cream cheese mixture to 3 tablespoons. The texture is slightly less rich but the layer remains smooth and fully cohesive.
Reduced sugar: The very ripe bananas provide substantial natural sweetness — reduce the granulated sugar to 100g and the brown sugar to 75g. The bars will be less sweet but the concentrated banana flavor from the brown butter step is more distinctly present when the surrounding sweetness is reduced.
Whole wheat variation: Replace 50g of the all-purpose flour with an equal weight of whole wheat pastry flour — the bars become slightly denser and more complex in flavor, with additional fiber per bar.
Dairy-free: Replace butter with refined coconut oil — noting that coconut oil produces a comparable brown butter-adjacent caramelization at the same temperature — and replace cream cheese with a vegan cream cheese alternative. The result is slightly less rich but maintains the characteristic flavor and texture.
Higher banana intensity: Use 5 bananas rather than 4 — the additional banana adds natural sweetness, more pronounced banana flavor, and additional moisture that may require an extra 3–5 minutes of baking time to compensate.
Serving Suggestions
Room temperature with coffee: The most straightforward and most satisfying format — a bar at room temperature alongside a strong coffee or espresso. The caramelized banana and brown butter flavors are most present at room temperature; cold bars from the refrigerator mute both the banana and the cream cheese character significantly.
Warm with ice cream: Microwave a bar for 15–20 seconds and serve with a scoop of vanilla bean ice cream — the warm bar against cold ice cream produces the temperature contrast that makes the cream cheese layer melt into the surrounding banana and creates a combined flavor that is more dessert than snack.
As a packed lunch treat: Cut into smaller pieces and pack individually — the bars hold their shape well at room temperature for 2 days and travel without deteriorating, making them one of the more practical homemade dessert options for school lunches, work desks, or picnics.
On a dessert board: Arrange cut bars alongside fresh banana slices, a small bowl of Nutella or peanut butter for dipping, a scattering of chocolate chips, and a few whole toasted walnuts for a banana-themed dessert board that is both visually interesting and practically assembled.
Gifting: Wrap individual bars in parchment paper and arrange in a box for a genuinely impressive homemade food gift — the cream cheese layer and the banana topping slice visible in cross-section communicate the care taken in preparation more clearly than a standard loaf or cookie would.
Common Mistakes to Avoid
Using under-ripe bananas. The deeply brown-spotted banana — soft, almost liquid at its core, intensely sweet and fragrant — is not merely a convenience but the specific ingredient the recipe requires. Moderately ripe yellow bananas produce a noticeably less intense banana flavor in the finished bar. If the bananas are not yet deeply spotted, accelerate ripening by baking unpeeled at 300°F (150°C) for 15–20 minutes until the skins are black and the interior is completely soft.
Not browning the butter. Regular melted butter produces a pleasant bar; brown butter produces a bar with caramelized, nutty depth that makes the difference between a good banana bar and a genuinely extraordinary one. The 5-minute browning step is the most impactful investment in the recipe.
Using cold cream cheese. Cold cream cheese does not mix smoothly and produces visible lumps in the filling layer. One hour out of the refrigerator is the minimum — press the cream cheese with your thumb before starting; it should leave a clean impression without resistance.
Over-mixing the batter. Over-mixing develops gluten and produces a tough, dense bar rather than the tender, fudge-like texture the recipe is designed around. Fold the flour in with the minimum strokes necessary to eliminate dry patches — 10–15 folds rather than the 30–40 of vigorous mixing.
Cutting before fully cooled. The cream cheese layer is fragile when warm — cutting before complete cooling produces ragged edges and cream cheese that smears across the cut surface rather than slicing cleanly. The full 2-hour cooling produces the clean, defined layer visible in cross-section.
Storing Tips
Room temperature: Store in an airtight container for up to 2 days — the bars hold their texture well and the flavor continues to develop over the first 24 hours.
Refrigerator: Store for up to 5 days. The cream cheese content means refrigeration is the recommended storage method beyond 2 days. Remove 20 minutes before serving to allow the bars to return to room temperature — the banana and brown butter flavors are significantly more present at room temperature than cold.
Freezer: Freeze individual bars wrapped in plastic wrap and then foil for up to 3 months. Thaw overnight in the refrigerator and bring to room temperature before serving. The texture after thawing is very close to fresh — cream cheese and banana batter both freeze and thaw well.
Make-ahead: These bars are an ideal make-ahead preparation — the flavor on day two is better than day one, the cream cheese layer has firmed completely, and the brown butter banana flavor has had time to develop fully through the bar. Bake the day before serving for the best result.
Conclusion
Creamy banana bars prove that the brown butter technique and the cream cheese addition are the two decisions that elevate a pleasant banana bake into something genuinely extraordinary — a bar with the concentrated, caramelized banana depth that only browned butter and deeply overripe fruit can produce, and the creamy, dense texture that only cream cheese folded into a batter can achieve. The banana baked good that makes banana bread feel like a preliminary sketch for the finished work.
Make them and share your results in the comments — tell us whether you added chocolate chips or walnuts, whether the brown butter step made the difference it always does, and how the bars lasted in your household. Leave a review, share with someone who bakes with overripe bananas and could be making something better with them, and subscribe to our newsletter for more technique-driven, deeply flavored baking recipes every week.
FAQs
Can I use frozen bananas? Yes — frozen and thawed bananas are ideal for this recipe. Freezing breaks down the cell walls and produces a mushier, more liquid banana that incorporates more completely into the batter. Thaw completely at room temperature and use all the accumulated liquid alongside the flesh — it contains concentrated banana flavor and natural sugars that contribute to the finished bar.
What if I don’t have brown butter technique experience? Brown butter is one of the more forgiving advanced techniques — the visual and aromatic cues are clear and unmistakable. Use a light-colored or stainless steel pan so the milk solid color is visible, use medium rather than high heat for a more gradual transition, and have the mixing bowl ready so you can pour immediately when the color is correct. The 3–4 minutes between beginning to foam and reaching the correct golden-brown color gives adequate time for adjustment.
Can I make these in a different pan size? Yes — an 8×8-inch (20x20cm) square pan produces thicker bars with a more pronounced cream cheese layer and a denser, fudgier texture. Increase the baking time by 8–10 minutes and verify doneness with the skewer test. A 9-inch round cake pan produces a bar cake format that is more elegant for serving at a dinner table.
Why did my bars sink in the center after baking? Sinking in the center indicates under-baking — the structure has not fully set and collapses as it cools. Ensure the skewer comes out with moist crumbs rather than wet batter before removing from the oven. If the surface is golden but the center is still wet, tent loosely with foil and continue baking in 5-minute increments until the skewer test passes.
Can I make these gluten-free? Yes — replace the all-purpose flour with a certified gluten-free 1:1 baking blend. Add ¼ teaspoon of xanthan gum if the blend does not already contain it. The texture will be very slightly denser than the wheat flour version but the cream cheese layer and the brown butter banana flavor are maintained. Almond flour also works in equal weight to the all-purpose flour for a naturally gluten-free, slightly denser, nuttier version.
How do I get perfectly clean cuts? Three techniques: cool the bars completely — ideally overnight — before cutting; use a sharp chef’s knife rather than a serrated knife; and dip the blade in hot water and wipe completely dry between every single cut. The warm, dry blade melts through the cream cheese layer cleanly and slides through the banana batter without dragging or compressing.