Follow Me On Social Media!
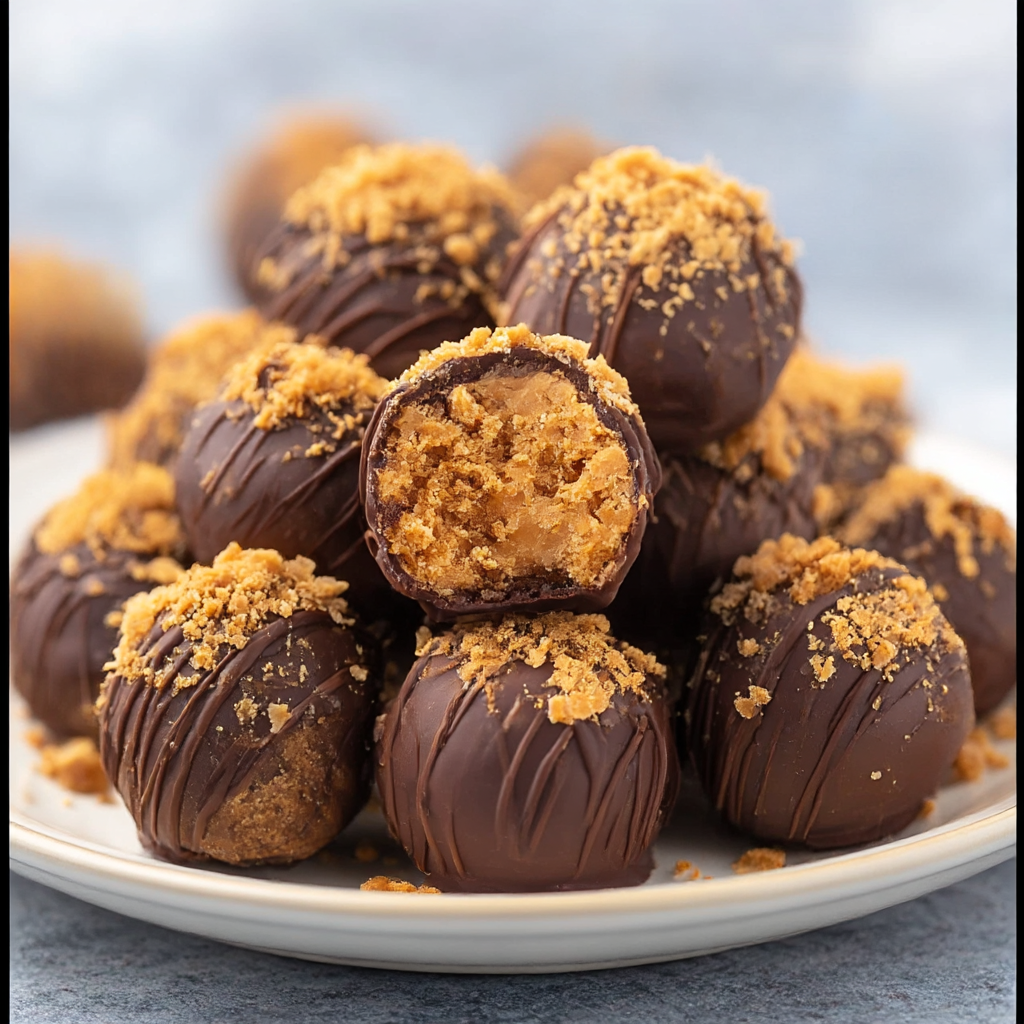
Butterfinger Balls
Introduction
Here is a question that will change how you think about no-bake desserts: what if the most crowd-pleasing, addictively delicious treat you could bring to any party, holiday gathering, or bake sale required no oven, no special equipment, and less than 30 minutes of your time? According to a 2024 survey by the National Confectioners Association, chocolate-peanut butter combinations rank as the single most popular dessert flavor pairing in the United States — ahead of chocolate-vanilla, chocolate-caramel, and every other combination surveyed. These Butterfinger balls deliver that exact pairing in a bite-sized, hand-held format that disappears faster than anything else on the dessert table.
Butterfinger balls are a no-bake confection built around crushed Butterfinger candy bars and creamy peanut butter, rolled into smooth spheres and dipped in melted chocolate to create a shell that shatters on the first bite to reveal the crispy, flaky, intensely flavored center beneath. They capture everything that makes the original candy bar so compelling — the honeycomb-like crunch, the peanut butter richness, the sweet-salty tension — and concentrate it into a two-bite treat that is simultaneously nostalgic, shareable, and genuinely impressive.
A 2023 food trend report by Mintel identified no-bake confections as the fastest-growing category in home dessert making, driven by a desire for maximum results with minimal effort and equipment. This recipe delivers exactly that — and produces a result that looks and tastes like it came from a professional candy shop.
Ingredients List
For the Butterfinger Filling
- 6 full-size Butterfinger candy bars (approximately 340g / 12 oz total), crushed (sub: 2 cups of Butterfinger baking bits)
- 1 cup (260g) creamy peanut butter (not natural peanut butter — the oil separation causes texture issues)
- 4 tbsp unsalted butter, softened to room temperature
- 1½ cups (180g) powdered sugar, sifted
- 1 tsp pure vanilla extract
- ¼ tsp fine sea salt (amplifies the peanut butter and candy flavors)
For the Chocolate Coating
- 400g (14 oz) good-quality milk or dark chocolate, finely chopped (sub: chocolate melting wafers for easier tempering)
- 1 tbsp coconut oil or vegetable shortening (thins the chocolate for a smoother, thinner coating)
For Finishing (Optional)
- Reserved crushed Butterfinger pieces, for sprinkling
- Flaky sea salt
- White chocolate drizzle
- Crushed peanuts
Timing
- Prep Time: 20 minutes
- Chilling Time: 30 minutes
- Dipping Time: 15 minutes
- Setting Time: 20 minutes
- Total Time: approximately 85 minutes (mostly hands-off chilling)
The active hands-on time here is under 35 minutes. The rest is the refrigerator doing the work. Make these the day before any event — they set overnight into the best version of themselves and hold beautifully for up to a week.
Step-by-Step Instructions
Step 1: Crush the Butterfinger Bars
Place the unwrapped Butterfinger bars in a zip-lock bag and seal, removing as much air as possible. Use a rolling pin to crush them into fine, irregular crumbs — aim for a mixture of fine powder and small pieces approximately 3–5mm in size. The variation in texture is intentional: fine crumbs bind the filling while larger pieces create the characteristic flaky crunch in every bite. Alternatively, pulse in a food processor 8–10 times until a rough crumb forms — do not over-process into a fine powder, which loses the textural contrast.
Step 2: Make the Filling
In a large mixing bowl, beat the softened butter and peanut butter together until completely smooth and well combined. Add the sifted powdered sugar, vanilla extract, and salt. Mix until a cohesive, slightly firm dough forms — it should hold its shape when pressed together without being sticky or crumbly. Fold in the crushed Butterfinger crumbs until evenly distributed throughout the mixture. If the mixture feels too soft to roll, refrigerate for 15 minutes before shaping.
Key tip: Use standard commercial creamy peanut butter — Jif, Skippy, or equivalent. Natural peanut butter contains separated oil that creates a greasy, unstable filling that does not hold its shape after rolling.
Step 3: Roll the Balls
Line a large baking sheet with parchment paper. Using a tablespoon measure or a small cookie scoop, portion the filling into even amounts. Roll each portion between your palms into smooth, round balls approximately 3cm (1¼ inches) in diameter. Work quickly — the warmth of your hands softens the mixture. If the balls become difficult to roll cleanly, refrigerate the mixture for 10 minutes and continue. Place each finished ball on the prepared baking sheet, spacing them apart.
Step 4: Chill Until Firm
Transfer the baking sheet to the refrigerator and chill the rolled balls for a minimum of 30 minutes until completely firm. This chilling step is non-negotiable — warm, soft balls will fall apart during dipping and the chocolate coating will not adhere cleanly to a room-temperature surface. Firm, cold balls dip cleanly, hold their shape, and allow the chocolate to set rapidly on contact.
Step 5: Melt the Chocolate
Place the finely chopped chocolate and coconut oil in a heatproof bowl set over a saucepan of barely simmering water — the bowl should not touch the water. Stir gently and continuously until the chocolate is completely melted and smooth. Alternatively, microwave in 30-second intervals at 50% power, stirring between each interval, until fully melted. Remove from heat and allow to cool for 3–4 minutes until slightly thickened but still fluid — chocolate that is too hot will create a very thin coating that does not set with a satisfying snap.
Key tip: Any trace of water in the chocolate will cause it to seize — turning it from smooth and fluid to a thick, grainy, unusable paste. Ensure all bowls, spoons, and tools are completely dry before contact with the chocolate.
Step 6: Dip the Balls
Working with one ball at a time, drop a chilled ball into the melted chocolate. Using a fork or a dipping tool, roll it to coat completely, then lift it out and tap the fork gently against the edge of the bowl to allow excess chocolate to drip off. Slide the coated ball onto the parchment-lined baking sheet. Immediately sprinkle with crushed Butterfinger pieces, flaky sea salt, or any other topping before the chocolate sets. Work quickly — the chocolate begins setting on the cold ball within seconds.
Step 7: Set and Serve
Allow the dipped balls to set at room temperature for 20 minutes if the kitchen is cool, or return to the refrigerator for 15 minutes for faster setting. Once the chocolate shell is completely firm and matte, the Butterfinger balls are ready to serve. Transfer to a serving platter or store in layers separated by parchment paper.

Nutritional Information
Per serving — based on 1 ball from a batch of 28.
| Nutrient | Per Serving | % Daily Value* |
|---|---|---|
| Calories | 165 kcal | 8% |
| Total Fat | 9g | 12% |
| Saturated Fat | 4g | 20% |
| Total Carbohydrates | 19g | 7% |
| Total Sugar | 15g | — |
| Protein | 3g | 6% |
| Dietary Fiber | 0.5g | 2% |
| Sodium | 95mg | 4% |
| Calcium | 2% DV | 2% |
| Iron | 4% DV | 4% |
*Based on a standard 2,000-calorie daily diet.
At 165 calories per ball with 3 grams of protein, these treats are portion-friendly by confection standards. The peanut butter contributes healthy monounsaturated fats and a small but meaningful protein contribution that makes them more satisfying than pure sugar-based confections of equivalent calorie count.
Healthier Alternatives
Lower sugar: Reduce the powdered sugar to 1 cup and add 1 tablespoon of honey to maintain binding and sweetness. The filling will be slightly less firm — chill for an extra 15 minutes before rolling.
Dark chocolate coating: Use 70%+ cacao dark chocolate instead of milk chocolate. This increases the antioxidant content, reduces the sugar in the coating by approximately 40%, and adds a bittersweet contrast to the sweet filling that many people find more sophisticated.
Lower fat filling: Reduce the butter to 2 tablespoons and replace with 2 tablespoons of cream cheese for a slightly tangier, lighter filling with a comparable binding texture.
Nut-free: Replace the peanut butter with sunflower seed butter in an equal quantity. The flavor profile shifts slightly but the texture is nearly identical and the result is entirely nut-free for school or allergy-sensitive events.
Smaller portions: Roll at 2 teaspoons per ball instead of 1 tablespoon to produce 40–45 smaller truffles at approximately 100 calories each — a more appropriate portion for dessert spreads where multiple items are being served.
Serving Suggestions
Holiday dessert tray: Arrange on a tiered stand alongside other no-bake confections — peanut butter fudge, chocolate truffles, and coconut balls — for a professional-looking holiday spread that required no oven.
Gift boxes: Layer between sheets of parchment paper in a decorative tin or box tied with ribbon. Butterfinger balls are one of the most giftable homemade confections — they travel well, hold for a week, and look impressive without elaborate packaging.
Bake sale standout: Individually wrap each ball in a small square of plastic wrap twisted at the top and display in a jar or basket. The individual wrapping suggests professional quality and makes them easy to sell at individual prices.
Dessert party platter: Serve at room temperature on a marble board alongside fresh strawberries, pretzel rods, and a small bowl of extra crushed Butterfinger for guests who want an extra sprinkle. The visual contrast of the glossy chocolate balls against the bright berries and salty pretzels is striking and appetizing.
Ice cream topping: Roughly chop leftover or slightly imperfect Butterfinger balls and scatter over vanilla or chocolate ice cream as a topping. The combination of cold ice cream, crunchy filling, and chocolate shell is an extraordinary improvisational sundae.
Common Mistakes to Avoid
Using natural peanut butter. The natural oil separation in natural peanut butter creates a greasy, unstable filling that refuses to hold its shape after rolling and develops an oily slick on the surface of the finished ball. Use standard commercial creamy peanut butter exclusively.
Not chilling before dipping. Room-temperature balls are too soft to survive the dipping process — they crack, deform, or fall apart on the fork. Thirty minutes of refrigeration until completely firm is the minimum and is non-negotiable for clean, professional-looking results.
Chocolate that is too hot. Overly hot chocolate produces a paper-thin coating that sets with a dull, matte, uneven finish rather than a smooth, glossy shell. Allow the melted chocolate to cool for 3–4 minutes after melting before dipping begins.
Water contact with the chocolate. A single drop of water causes chocolate to seize irreversibly. Ensure every piece of equipment is bone dry before beginning the melting process.
Over-processing the Butterfinger crumbs. A fine, uniform powder loses the flaky, crunchy texture that makes these balls distinctive. Pulse briefly or crush with a rolling pin to preserve an irregular, varied crumb with both powder and small pieces.
Not working quickly during garnishing. The chocolate sets rapidly on cold balls. Each garnish must be applied within seconds of the ball landing on the parchment — delay and the topping will not adhere to the hardened shell.
Storing Tips
Room temperature: Store in a single layer or between parchment sheets in an airtight container at cool room temperature for up to 3 days. Avoid warm environments — the chocolate softens and loses its snap above 70°F (21°C).
Refrigerator: Store in an airtight container between parchment layers for up to 10 days. Remove 15–20 minutes before serving — cold chocolate is slightly waxy and the full flavor of the filling is muted when eaten directly from the refrigerator.
Freezer: Freeze on a baking sheet until solid, then transfer to a freezer-safe bag for up to 2 months. Thaw in the refrigerator for 2 hours before serving. Frozen Butterfinger balls are nearly indistinguishable from fresh once fully thawed.
Make-ahead: Roll and chill the undipped balls up to 48 hours in advance and keep refrigerated. Dip in chocolate the day of serving for the freshest possible result with the glossiest coating.
Conclusion
Butterfinger balls are the no-bake confection that outperforms everything else on the dessert table — every single time. Crispy, flaky, peanut-buttery filling encased in a snapping chocolate shell, ready in under 35 minutes of active work, and good for up to a week in the refrigerator. Make a double batch — the first disappears faster than you expect.
Make these for your next event and share your results in the comments — tell us which chocolate you used, which toppings you tried, and how long they lasted before disappearing. Leave a review, share this with someone who loves Butterfinger, and subscribe to our newsletter for more no-bake, crowd-pleasing recipes every week.
FAQs
Can I use Butterfinger baking bits instead of crushing whole bars? Yes — Butterfinger baking bits are a convenient direct substitute and produce an almost identical result. Use 2 cups to replace the 6 full-size bars called for in the recipe. The texture of the filling will be slightly more uniform since the baking bits are pre-crushed to a consistent size.
Why is my filling too soft to roll? The most common cause is peanut butter that is too warm or natural peanut butter with separated oil. Refrigerate the mixture for 15–20 minutes, then try rolling again. If still too soft, add an additional 2–3 tablespoons of sifted powdered sugar to firm the mixture before chilling.
Can I use white chocolate for the coating? Absolutely — white chocolate produces a visually striking contrast against the Butterfinger crumb garnish and a sweeter, creamier flavor profile. White chocolate is more sensitive to heat than milk or dark chocolate — melt at 50% microwave power in 20-second intervals and stir frequently to prevent scorching.
How do I get a smooth, professional-looking chocolate coating? Three factors produce a smooth coating: chocolate that has been allowed to cool slightly after melting, cold and very firm balls, and allowing excess chocolate to drip fully before placing on the parchment. Tapping the fork firmly against the bowl edge 4–5 times removes the excess that would otherwise pool at the base of the ball and create a flat, uneven foot.
Can I make these nut-free for school events? Yes. Replace peanut butter with sunflower seed butter in equal quantity and verify that your chocolate brand is produced in a nut-free facility — many chocolate products carry nut cross-contamination warnings that make them unsuitable for strict nut-free environments. Sunflower seed butter produces a nearly identical texture with a slightly different but equally pleasant flavor.
Do these need to be refrigerated? They do not require refrigeration for short-term storage of up to 3 days in a cool environment. However, refrigeration extends shelf life to 10 days and is recommended in warm climates or during summer months when room temperature can soften the chocolate coating. Always serve at room temperature for the best flavor and texture experience.