
Follow Me On Social Media!
Homemade Chocolate-Hazelnut Cups
Make homemade chocolate-hazelnut cups with a smooth chocolate shell and creamy filling. This easy no-bake recipe includes step-by-step instructions, tips, and storage advice.

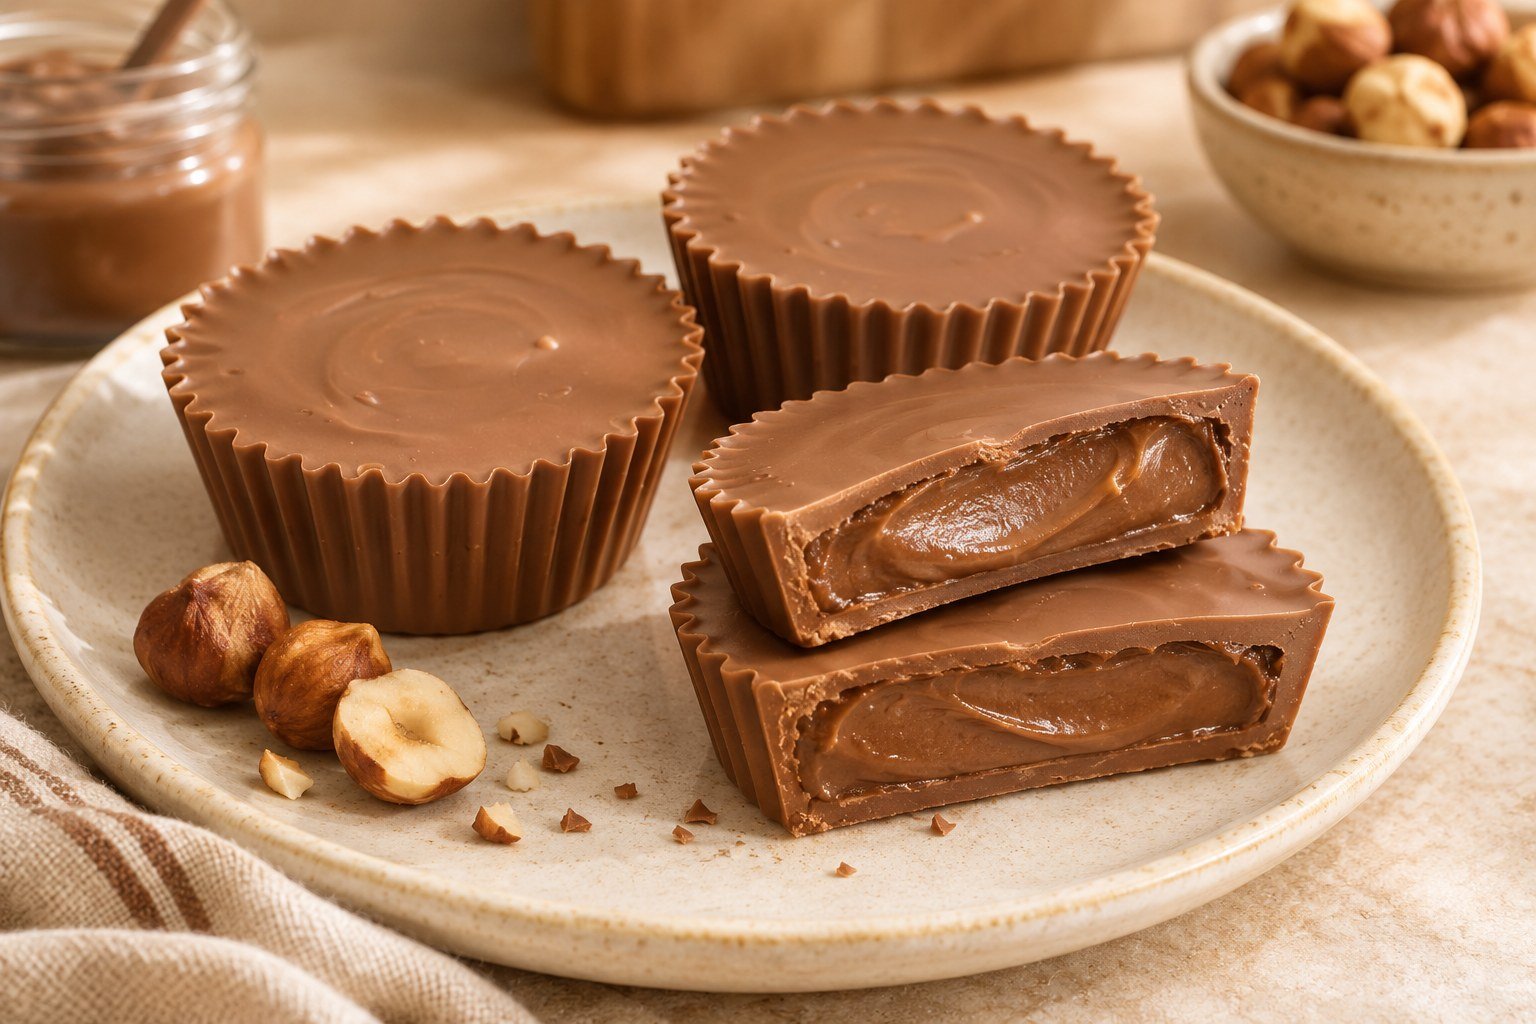
Homemade chocolate-hazelnut cups pair a firm chocolate shell with a soft, nutty chocolate center. With their fluted edges and smooth tops, they look like candy-shop treats, but you can make them in a muffin tin with just two main ingredients.
This easy, no-bake version uses melted chocolate and ready-made chocolate-hazelnut spread. A little patience between layers keeps the filling enclosed and gives each cup a neat finish. Make a batch for a dessert platter, an afternoon treat, or a homemade gift kept chilled until serving.
Why You’ll Love These Chocolate Cups
- No oven, candy thermometer, or special mold required.
- Only two essential ingredients, with optional crunchy hazelnuts.
- A crisp, chilled chocolate shell around a creamy filling.
- Easy to make ahead and portion into individual treats.
What You’ll Need
Chocolate: A finely chopped milk chocolate baking bar melts smoothly and gives the cups a mellow, sweet flavor. Semisweet chocolate is a good choice for a less sweet shell. Chocolate chips can work, but some brands melt more thickly, making them harder to spread into a thin layer.
Chocolate-hazelnut spread: Use a smooth, ready-made spread with a spoonable consistency. If the oil has separated, stir the jar thoroughly before measuring. A very runny natural spread may leak more easily and is less suitable for these cups.
Optional extras: Finely chopped toasted hazelnuts add crunch, while a tiny pinch of flaky salt balances the sweetness.
Homemade Chocolate-Hazelnut Cups Recipe
Yield: 12 shallow, standard-muffin-size cups
Serving size: 1 cup
Prep time: 25 minutes
Melting time: About 5 minutes
Chilling time: 45-60 minutes total
Total time: About 1 hour 15 minutes to 1 hour 30 minutes
Method: No-bake
Ingredients
- 16 ounces (450 g) milk or semisweet chocolate, finely chopped and divided
- 1/2 cup (about 150 g) smooth chocolate-hazelnut spread
- 2 tablespoons finely chopped toasted hazelnuts, optional
- A small pinch of flaky sea salt for the tops, optional
Equipment
- 12-cup standard muffin tin
- 12 paper cupcake liners or silicone muffin liners
- Microwave-safe bowl and a dry spoon or silicone spatula
- Teaspoon and a small pastry brush or the back of a spoon
Step-by-Step Instructions
- Prepare the pan. Place a liner in each muffin well. Make sure the bowl and utensils are completely dry; even a little water can cause melted chocolate to seize.
- Melt the shell chocolate. Place 10 ounces (280 g) of the chocolate in a microwave-safe bowl. Microwave at 50% power in 20-30-second bursts, stirring well after each burst. Stop when only a few small pieces remain and stir until smooth. Alternatively, melt over a bowl of gently simmering water without letting the bowl touch the water.
- Coat the liners. Divide the melted chocolate among the 12 liners. Spread it across the base and about 1/2 inch up the sides with the back of a spoon or a small brush. Aim for a continuous shell with no gaps, rather than coating the entire height of the liner.
- Chill the shells. Refrigerate for 15-20 minutes, until firm. Check the sides for any bare spots. If needed, patch them with a little chocolate taken from the remaining portion and chill again until set.
- Add the filling. Stir the chopped hazelnuts into the spread if using. Spoon 2 teaspoons of filling into each shell and gently flatten it. Keep the filling just inside the chocolate edges and below the rim so the top layer can seal to the shell.
- Melt the remaining chocolate. Melt the remaining 6 ounces (170 g) using the same gentle method. Let it cool briefly until still fluid but no longer hot.
- Seal the cups. Divide the chocolate over the filling. Spread it to meet the shell all the way around, covering the filling completely. Gently tap the tin on the counter to level the tops. Add a few flakes of salt if desired.
- Chill and unmold. Refrigerate for another 30-40 minutes, or until the cups are fully firm. Carefully peel away the liners. Let the cups stand at room temperature for about 5 minutes before serving if you prefer a softer bite.
Tips for Neat Chocolate Cups
Build an Even Shell
The most useful place to spend an extra minute is on the first chocolate layer. A thick puddle on the bottom and a very thin coating on the sides can make the finished cup difficult to bite without cracking. Spread the chocolate across the base, then draw it upward with small strokes, rotating the liner as you work.
Hold a coated liner at a slight angle before chilling. If you can see paper through a patch of chocolate, cover that spot. Keep the rim fairly level so the topping can meet it later. You do not need perfectly identical cups; a continuous shell matters more than a flawless shape.
Keep the shell shallow. These are candy cups, not filled cupcakes. A shallow shell makes the amount of chocolate and filling easier to balance.
Do not overfill. Leave enough room for the final chocolate layer to connect with the sides. Filling spread onto the rim can prevent a complete seal.
Melt gently. Chocolate can scorch before it looks fully melted. Short bursts and frequent stirring give you more control than one long microwave cycle.
Expect a chilled finish. This simple recipe does not temper the chocolate. The cups are best kept refrigerated and may soften or develop pale streaks if stored warm. For a candy-shop snap at room temperature, you would need a separate tempering method suited to your chocolate.
Keep the Filling Easy to Portion
Use the hazelnut spread at a cool room temperature. It should be soft enough to scoop but thick enough to hold a small mound. Spread straight from a cold refrigerator can be difficult to flatten, while very warm spread can run against the rim. If yours is too firm, let the closed jar stand at room temperature until spoonable rather than adding liquid.
A measuring teaspoon makes portioning simple: two level teaspoons per cup use the full half-cup of filling across twelve cups. If you include chopped hazelnuts, divide the slightly larger mixture evenly. Gently flatten the filling instead of pressing hard against the chilled chocolate base.
Choosing Milk, Semisweet, or Dark Chocolate
Milk chocolate gives these cups a sweet, creamy flavor that complements the chocolate-hazelnut center. It is a good choice when you want a familiar candy-bar style treat. Because both the shell and filling are sweet, a little optional flaky salt can add balance without changing the basic recipe.
Semisweet chocolate creates more contrast with the filling. Dark chocolate makes the cocoa flavor more pronounced, although the finished taste depends on the bar you choose. Pick a chocolate you enjoy eating on its own: with so few ingredients, its flavor remains noticeable in every bite.
White chocolate would give a much sweeter variation and requires particularly gentle melting. For a first batch, milk or semisweet chocolate is the most straightforward choice. Avoid swapping in cocoa powder or chocolate syrup; neither will form the shell this recipe needs.
Microwave or Double Boiler?
The microwave method is convenient for a small batch. Chop the chocolate into similar-size pieces, use reduced power, and stir after every short interval. The bowl may feel warm even when the chocolate still looks solid. Stirring redistributes that heat and often melts the last pieces without another heating cycle.
For the stovetop method, set a heatproof bowl over a saucepan containing a little gently simmering water. The bowl should sit above the water rather than in it. Stir until melted, lift the bowl away carefully, and wipe its underside before moving to your work surface so droplets do not fall into the chocolate or liners.
Either method works. Choose the one you can watch closely, and melt the chocolate for the top layer only when the filled shells are ready. If melted chocolate begins to set while you work, warm it gently again instead of forcing thick chocolate across the delicate shells.
Troubleshooting Common Problems
The Cups Crack When I Peel Off the Liners
The shell may be too thin, or the cups may not have chilled long enough. Let them set fully, then peel the paper away a little at a time while supporting the base. Silicone liners should be eased outward before you push the cup up from underneath. For the next batch, reinforce thin spots before adding the filling.
The Filling Leaks Out
A gap between the shell and lid is the usual culprit. Keep the filling below the rim, then spread the topping until it touches chocolate around the entire edge. If the spread is unusually loose, choose a thicker, smooth variety for your next batch. Keep finished cups chilled so the shell stays firm.
The Tops Look Uneven
The topping may have cooled too much before spreading, or the filling underneath may be mounded. Flatten the filling gently and use chocolate that is still fluid. Tap the tin lightly on the counter before the tops set. Small swirls from the spoon are part of the homemade appearance and do not affect the flavor.
The Shell Is Too Hard to Bite
A thick shell or a very cold cup can feel quite firm. Let a cup stand for about five minutes before eating and see whether you prefer that texture. Next time, spread the base more evenly instead of leaving a thick pool underneath. Cutting a large cup in half also makes a rich serving easier to enjoy.
There Are Pale Streaks on the Chocolate
Untempered chocolate can develop a streaky or dull appearance as it sets or experiences temperature changes. The finish may look different from a glossy store-bought candy. Store these cups at a steady refrigerator temperature in a sealed container and avoid repeatedly moving the whole batch between warm and cold places.
Variations
- Dark chocolate cups: Replace the milk chocolate with semisweet or dark chocolate for a stronger cocoa flavor.
- Extra crunch: Use the optional toasted hazelnuts in the filling, chopped finely so the top stays easy to cover.
- Mini cups: Use mini muffin liners and smaller portions. The yield will depend on your liner size; keep the same thin shell and enclosed filling.
- Dairy-free option: Choose chocolate and hazelnut spread explicitly labeled dairy-free. Many standard chocolate-hazelnut spreads contain milk.
How to Store Them
Store the finished cups in a covered container in the refrigerator for up to 2 weeks for best quality, using parchment between layers. Keep them away from strong-smelling foods. For longer storage, freeze in an airtight container for up to 2 months and thaw in the refrigerator before unwrapping to help reduce condensation.
Make-Ahead and Small-Batch Options
For a relaxed schedule, coat and chill the shells the evening before, then cover the pan and refrigerate it overnight. Add the filling and seal the tops the following day. Keep the empty shells in their liners during this stage so you can handle them without breaking the edges.
To make six cups, use 8 ounces (225 g) chocolate and 1/4 cup (about 75 g) chocolate-hazelnut spread. Divide the chocolate into roughly 5 ounces (140 g) for the shells and 3 ounces (85 g) for the tops. Use 1 tablespoon chopped hazelnuts if desired. The chilling time stays about the same because the individual cups are the same size.
For a double batch, work with two muffin tins and melt the chocolate in manageable portions. This keeps you from rushing to spread a large bowl of chocolate before it thickens. Make sure you have enough level refrigerator space before you begin.
Serving and Gifting Ideas
Serve these cups on a small dessert plate with coffee, tea, or a glass of milk. For a dessert board, pair them with fresh berries, plain shortbread, and a few toasted nuts. The contrast in texture makes the rich chocolate filling feel especially satisfying.
For a party, bring out a small plate at a time and replenish it from the refrigerator. Keep the cups away from direct sunlight or warm serving dishes. They are best suited to an indoor dessert table rather than a hot outdoor buffet.
To package as gifts, leave the cups in clean liners and arrange them in a rigid container in a single layer. Keep the box chilled until handing it over and let the recipient know to refrigerate it. Include an ingredient note: chocolate-hazelnut spread contains hazelnuts, and many brands of chocolate and spread also contain milk or soy.
Frequently Asked Questions
Can I use chocolate chips?
Yes, but choose a brand that melts smoothly. Some chips hold their shape and produce thicker melted chocolate. A chopped baking bar is generally easier to brush up the sides.
Do I need coconut oil?
No. This recipe uses chocolate alone for the shell. Adding oil makes the shell softer, especially at room temperature.
Why did my chocolate turn thick and grainy?
It may have overheated or come into contact with water. Start with dry utensils, heat gently, and keep steam out of the bowl. Chocolate that has seized is difficult to use for a smooth candy shell.
Can I make them without paper liners?
Flexible silicone muffin liners work well. Avoid pouring the chocolate directly into an unlined metal muffin tin, where the cups can be difficult to remove.
Can I Use Homemade Hazelnut Spread?
Yes, if it is smooth, thick, and made with ingredients suitable for this style of candy. Homemade spreads vary greatly in texture. A loose, oily mixture may be harder to enclose. If your homemade filling contains fresh dairy or other perishable additions, follow its own shorter storage guidance rather than the storage time for this recipe.
Can I Add a Whole Hazelnut to Each Cup?
You can press a small toasted hazelnut into the center, provided it sits below the shell’s rim. Large nuts may make the filling too tall for a neat seal, so chopped hazelnuts are easier to distribute evenly.
Can I Use Peanut Butter Instead?
A thick, smooth peanut butter can create a different filled chocolate cup using the same layering method. The flavor will change completely, and a runny natural peanut butter can be more difficult to seal. For the chocolate-hazelnut flavor in this recipe, stick with chocolate-hazelnut spread.
How Do I Get a Clean Cut for Serving?
Let a chilled cup soften briefly at room temperature. Use a sharp knife, cut with steady pressure, and wipe the blade between cuts. A very cold cup may crack rather than slice neatly. If you warm the knife, dry it thoroughly before touching the chocolate.