Follow Me On Social Media!
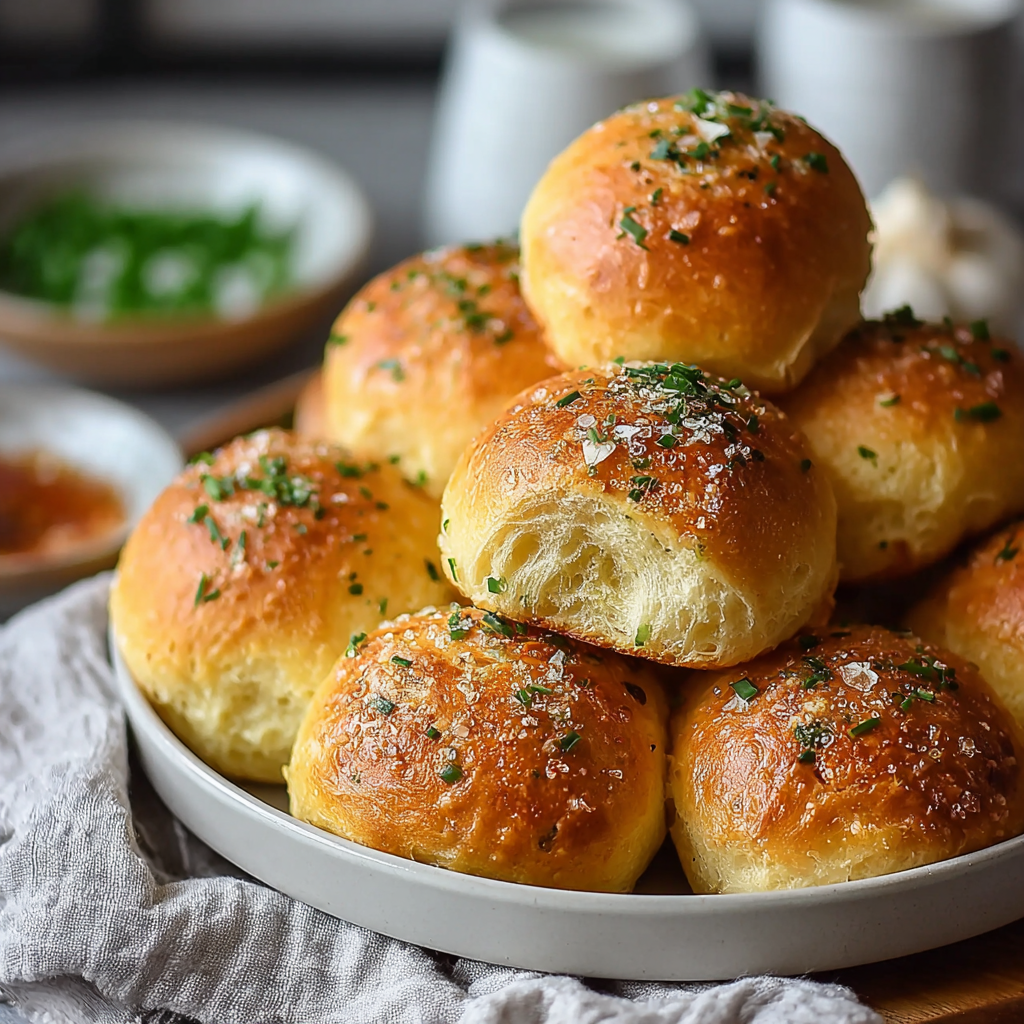
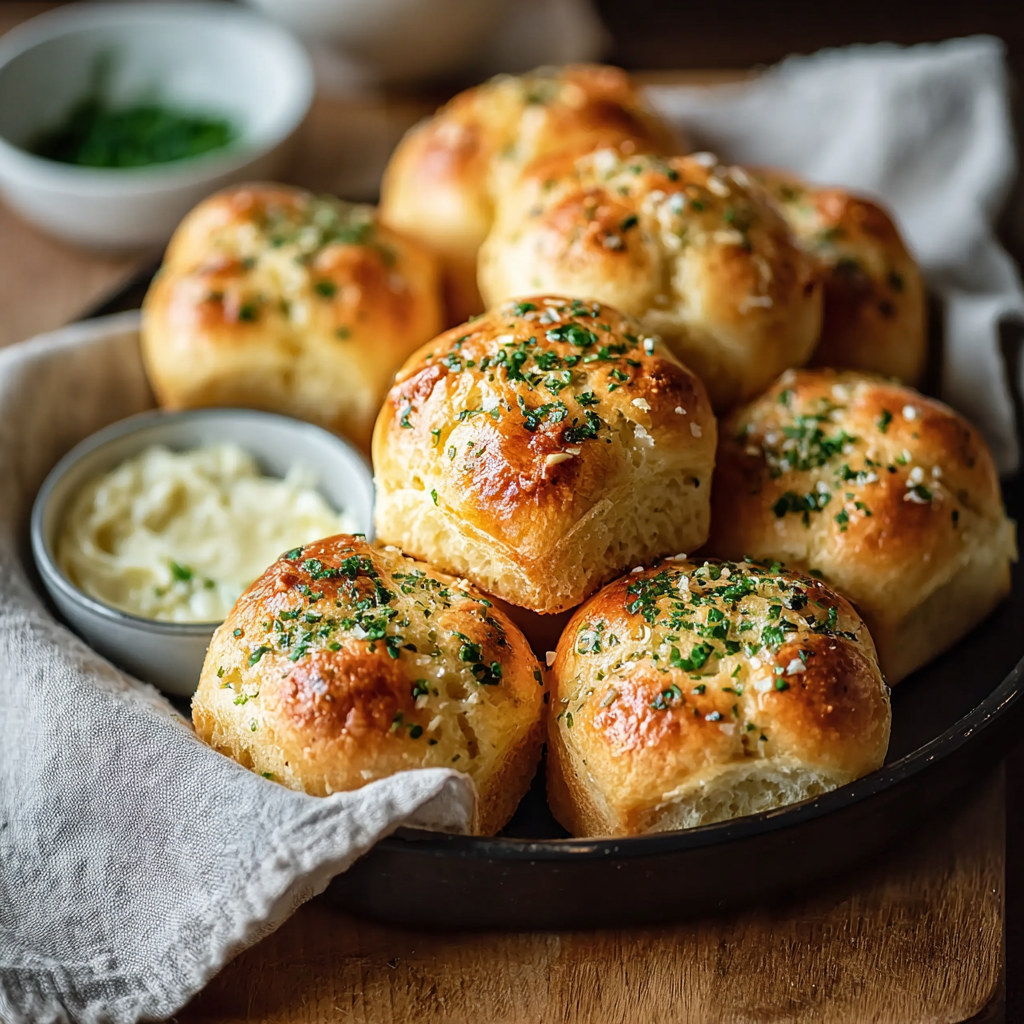
Melting Garlic Butter Rolls
Introduction
Here is a question that challenges the assumption that homemade bread is the domain of experienced bakers with stand mixers, proofing drawers, and an afternoon to spare: what if the most impressive, most aromatic, most genuinely irresistible rolls you have ever pulled from your oven required nothing more than a basic yeast dough, one proof instead of two, and a garlic butter so fragrant and deeply flavored that it turns the simple act of breaking a warm roll apart into one of the most satisfying experiences available from a home kitchen?
According to a 2024 home baking trend report by King Arthur Baking, pull-apart garlic rolls represent the single fastest-growing bread recipe category in home baking — driven by the discovery that the combination of soft, pillowy roll dough, melted garlic butter poured between and over the rolls before and after baking, and the social format of rolls that pull apart at the table produces both a sensory and a social experience that pre-sliced bread can never replicate. The moment the rolls emerge from the oven, golden and glistening, the kitchen fills with the garlic fragrance that signals dinner is ready in a way that no other bread preparation can achieve.
These melting garlic butter rolls take the pull-apart roll concept to its logical conclusion — a dough enriched with butter and milk for maximum softness, shaped into rolls that are packed tightly in a baking dish so they rise into each other and develop the tender, pull-apart sides that make this format so distinctive, drenched in a garlic compound butter that seeps between each roll during baking and caramelizes on the exposed tops into a deeply golden, slightly crispy surface. The butter melts into the dough during baking, enriching every layer of every roll — hence the name.
A 2023 food science review in the Journal of Cereal Science confirmed that butter-enriched yeast doughs — brioche-adjacent formulations with a high fat content — produce a measurably softer, more tender crumb than lean doughs through the fat’s ability to coat gluten strands and limit their bonding, resulting in a finer, more even crumb structure that remains soft for significantly longer than unenriched doughs after baking.
Ingredients List
For the Dough
- 420g (3½ cups) all-purpose flour, plus extra for dusting (sub: bread flour for a chewier roll)
- 7g (2¼ tsp / 1 packet) instant dry yeast
- 1 tsp fine sea salt
- 2 tbsp granulated sugar
- 240ml (1 cup) whole milk, warmed to 110°F (43°C)
- 60g (4 tbsp) unsalted butter, melted and slightly cooled
- 1 large egg, room temperature
- 1 tsp garlic powder (added to the dough — the garlic character runs through the entire roll, not only the surface)
For the Garlic Butter
- 115g (½ cup / 1 stick) unsalted butter, melted
- 6 garlic cloves, minced to a paste (salt and flat-of-knife method — see Cheesy Garlic Bread recipe)
- 2 tbsp fresh flat-leaf parsley, very finely chopped
- ½ tsp fine sea salt
- ¼ tsp freshly ground black pepper
- ¼ tsp onion powder
- Pinch of red pepper flakes (optional)
For the Topping (Optional)
- ½ cup (55g) freshly shredded Parmesan or mozzarella (scattered over the rolls in the final 5 minutes)
- Additional fresh parsley
- Flaky sea salt
Timing
- Dough Prep: 10 minutes
- First and Only Rise: 60–75 minutes
- Shaping: 10 minutes
- Bake Time: 22–25 minutes
- Total Time: approximately 1 hour 45 minutes (mostly hands-off)
The active hands-on preparation is under 20 minutes — the remainder is the yeast doing the work.
Step-by-Step Instructions
Step 1: Make the Dough
In a large bowl or the bowl of a stand mixer, combine the flour, instant yeast, salt, sugar, and garlic powder. Whisk together briefly to distribute the yeast and salt evenly through the flour. In a separate bowl or measuring jug, whisk together the warm milk, melted butter, and egg.
Pour the wet ingredients into the dry ingredients and mix with a wooden spoon until a shaggy dough forms. Turn out onto a lightly floured surface and knead by hand for 8–10 minutes — or knead with a stand mixer fitted with the dough hook on medium speed for 5–6 minutes — until the dough is smooth, elastic, and slightly tacky rather than sticky. The correctly developed dough passes the windowpane test: stretch a small piece between your fingers — it should stretch thin enough to see light through without tearing.
Key tip: The milk temperature is the most technically important variable in this recipe. Milk above 120°F (49°C) kills the yeast; milk below 100°F (38°C) fails to activate it properly. The target is 110°F (43°C) — warm but not hot when tested on the inside of the wrist.
Step 2: First and Only Rise
Shape the dough into a ball and place in a lightly oiled bowl. Cover with plastic wrap or a damp kitchen towel and leave to rise in a warm, draft-free location for 60–75 minutes until doubled in size. A cold kitchen will require up to 90 minutes; a warm kitchen may need only 45. The dough is ready when it springs back slowly — rather than immediately — when pressed with a floured finger.
Key tip: An oven with only the light on — no heat — provides a consistently warm, draft-free environment at approximately 75–80°F (24–27°C) that is ideal for yeast dough proofing. This simple technique eliminates the variability of kitchen temperature.
Step 3: Make the Garlic Butter
While the dough rises, make the garlic butter. Combine the melted butter, garlic paste, chopped parsley, salt, pepper, onion powder, and red pepper flakes in a bowl. Stir together until completely combined and fragrant. Reserve 3 tablespoons of the garlic butter in a separate small bowl — this portion will be applied after baking for the final, freshest garlic flavor.
Step 4: Shape the Rolls
Grease a 9×13-inch (23x33cm) baking dish generously with butter or cooking spray. Punch down the risen dough gently to release the gas and turn onto a lightly floured surface. Divide into 15 equal pieces — approximately 55g each. A kitchen scale produces the most uniform rolls; dividing by eye produces acceptable results with minor size variation.
Shape each piece into a smooth ball by pulling the sides of the dough down and pinching underneath — creating surface tension that produces a round, smooth-topped roll. Place in the greased baking dish in a 3×5 arrangement with the smooth sides facing up and the edges touching — the rolls should be snug against each other. This tight arrangement is what produces the pull-apart texture as the rolls rise into each other during both proofing and baking.
Pour approximately half the garlic butter over the arranged rolls — using a pastry brush or spoon to distribute it between the rolls and over the tops.
Step 5: Second Rest
Cover the shaped rolls loosely with plastic wrap and allow to rest for 20–30 minutes at room temperature — they will puff slightly and relax. Meanwhile, preheat the oven to 375°F (190°C). This second rest is shorter than a conventional second proof but allows the rolls to recover from the shaping process and produce a lighter, more evenly risen final roll.
Step 6: Bake
Bake at 375°F (190°C) for 18–20 minutes until the rolls are puffed and the tops are beginning to turn golden. At this point — if using cheese — scatter the Parmesan or mozzarella over the tops of the rolls and return to the oven for a further 4–5 minutes until the cheese is melted, golden, and slightly caramelized and the rolls are deeply golden across all exposed surfaces.
Key tip: The rolls bake within each other and the touching surfaces remain soft and pull-apart — only the top surfaces brown and caramelize. This is the defining textural characteristic of the pull-apart format and is entirely by design.
Step 7: Apply the Reserved Garlic Butter and Serve
Remove from the oven and immediately brush or pour the reserved garlic butter over the hot rolls — every surface, between every visible gap. The reserved butter applied after baking produces a fresher, more vibrant garlic character than the butter that cooked in the oven, and the hot rolls absorb it immediately. Scatter fresh parsley and a pinch of flaky sea salt over the surface. Serve directly from the baking dish at the table — pulling the rolls apart is both the serving method and the most satisfying part of the experience.
Nutritional Information
Per serving — based on 15 rolls, 1 roll per serving, with cheese topping.
| Nutrient | Per Serving | % Daily Value* |
|---|---|---|
| Calories | 220 kcal | 11% |
| Total Fat | 11g | 14% |
| Saturated Fat | 6g | 30% |
| Total Carbohydrates | 26g | 9% |
| Total Sugar | 2g | — |
| Protein | 6g | 12% |
| Dietary Fiber | 1g | 4% |
| Sodium | 230mg | 10% |
| Calcium | 8% DV | 8% |
| Iron | 10% DV | 10% |
*Based on a standard 2,000-calorie daily value.
At 220 calories per roll with 6 grams of protein and 10% of the daily iron value from the enriched flour and egg, these rolls provide a more nutritionally meaningful bread accompaniment than most commercial dinner rolls.
Healthier Alternatives
Whole wheat variation: Replace 140g (1 cup) of the all-purpose flour with an equal weight of whole wheat flour. The rolls will be slightly denser and nuttier in flavor — add 1 additional tablespoon of milk to compensate for whole wheat’s higher water absorption. This variation increases the fiber content by approximately 2 grams per roll.
Lower fat: Reduce the butter in the garlic butter to 75g and replace the remaining amount with extra virgin olive oil — the olive oil version has a different but equally excellent flavor profile with a better fat composition.
Dairy-free: Replace the whole milk with full-fat oat milk, the butter in the dough with refined coconut oil, and the garlic butter with a high-quality plant-based butter. The texture is comparable and the flavor shift is minimal.
Higher protein: Add 2 tablespoons of vital wheat gluten to the flour — this increases both the protein content per roll and the chewiness of the finished roll’s texture, producing a result closer to a bakery-style dinner roll.
Serving Suggestions
Pull-apart at the table: Serve the baking dish directly on the table and allow guests to pull individual rolls from the pan — the moment of separation, revealing the soft, garlic-soaked interior sides, is as satisfying for the participants as the eating that follows.
Alongside pasta: The universal application — these rolls alongside any pasta dish, particularly cream or tomato-based preparations, serve as both bread and sauce-mopper simultaneously.
With soup: Serve alongside tomato soup, minestrone, or any substantial broth for the bread-and-soup pairing that these rolls make genuinely extraordinary.
As a dinner party centerpiece bread: Present the baking dish on a wooden board with a small bowl of whipped butter and a second bowl of additional garlic butter for those who want more. This presentation makes homemade bread feel like an event rather than an accompaniment.
As a make-ahead gift: Prepare the shaped, proofed rolls in a disposable baking dish, pour the garlic butter over, cover tightly, and refrigerate for up to 24 hours. Gift to a recipient with baking instructions — a genuinely impressive edible gift that requires only 25 minutes of oven time.
Common Mistakes to Avoid
Milk that is too hot. Milk above 120°F (49°C) kills the yeast and produces rolls that never rise — a mistake that cannot be corrected after the fact. Verify the temperature with a thermometer or the wrist test.
Under-kneading the dough. Insufficiently kneaded dough lacks the developed gluten network that produces the elastic, soft, tender roll — it will rise but produce a denser, less pleasant crumb. The full 8–10 minutes of hand kneading or 5–6 minutes of machine kneading is required.
Rolls too far apart in the dish. Rolls placed with space between them rise independently rather than into each other — producing individual rolls without the pull-apart character. Pack them snugly.
Not applying garlic butter after baking. The garlic butter applied during baking produces richness and flavor in the baked roll — but the garlic allicin is significantly reduced by oven heat. The reserved portion applied after baking provides the fresh, pungent garlic character that makes the rolls genuinely garlicky. Both applications are necessary.
Cutting rather than pulling the rolls. The pull-apart format is the experience — cutting the rolls with a knife produces ordinary bread. Pull them apart at the table for the full effect.
Storing Tips
Room temperature: Store covered at room temperature for up to 2 days. Reheat in a 350°F (175°C) oven covered with foil for 10 minutes — the rolls return to close to their fresh-baked softness.
Refrigerator: Store covered for up to 4 days. Reheat as above, adding an additional tablespoon of melted garlic butter over the tops before reheating.
Freezer: Freeze the fully baked, cooled rolls in an airtight container for up to 3 months. Thaw overnight in the refrigerator and reheat covered in a 350°F (175°C) oven for 12–15 minutes.
Make-ahead unbaked: After shaping and placing in the baking dish, cover tightly with plastic wrap and refrigerate overnight — up to 18 hours. The rolls proof slowly in the refrigerator. Remove 30 minutes before baking to come to room temperature and puff slightly before adding the garlic butter and baking as directed.
Conclusion
Melting garlic butter rolls prove that the most impressive homemade bread experience is not the most technically demanding — it is the one that understood that butter-enriched dough, fresh garlic applied twice, and the pull-apart format produce a sensory and social experience that no other bread preparation can quite replicate. One bowl, one proof, one pan, and a kitchen that smells like the reason people love to cook.
Make them and share your results in the comments — tell us which pasta or soup you served them with, whether the pull-apart moment was as satisfying as expected, and whether the reserved garlic butter made the difference it always does. Leave a review, share with someone who has always wanted to make homemade rolls, and subscribe to our newsletter for more approachable, deeply rewarding baking recipes every week.
FAQs
Can I use active dry yeast instead of instant yeast? Yes — with one modification. Active dry yeast requires activation before use: dissolve it in the warm milk with the sugar and allow to sit for 5–10 minutes until foamy before adding to the flour. Instant yeast can be added directly to the dry ingredients without activation. The finished rolls are identical — the only difference is the activation step.
Why didn’t my rolls rise? Three possible causes: the milk was too hot and killed the yeast; the yeast was old or expired; or the proofing environment was too cold. Verify the milk temperature before adding to the flour, check the yeast expiration date, and proof in a warm location — inside an oven with only the light on is the most reliable option.
Can I make these rolls smaller for a larger batch? Yes — divide the dough into 24 pieces rather than 15 for smaller, more bite-sized rolls. Use a 9×13 pan for the first 15 and a smaller 8×8 pan for the remaining 9, or two 9×13 pans for a double batch. Reduce the baking time by 3–4 minutes for smaller rolls.
Can I add herbs or cheese to the dough? Yes — fold 1 cup of freshly shredded cheddar or Gruyère into the dough after kneading and before the first rise. Fresh rosemary, thyme, or chives added to both the dough and the garlic butter produce an herbed version with a more complex aromatic character. Sun-dried tomatoes chopped finely and folded into the dough add a savory, slightly acidic depth.
How do I know when the dough is properly kneaded? The windowpane test: stretch a small piece of dough between your fingers. Properly kneaded dough stretches thin enough to see light through without tearing — the gluten network is strong and elastic. Under-kneaded dough tears immediately rather than stretching. This test can be performed at any point during kneading to assess progress.
Can I make these without a stand mixer? Yes — hand kneading for 8–10 minutes produces identical results to machine kneading. The dough starts sticky and rough and becomes smooth and elastic through the kneading process. Wet hands rather than heavily floured ones prevent excessive flour incorporation that would tighten the dough. A bench scraper helps manage a sticky dough on the work surface.