Follow Me On Social Media!
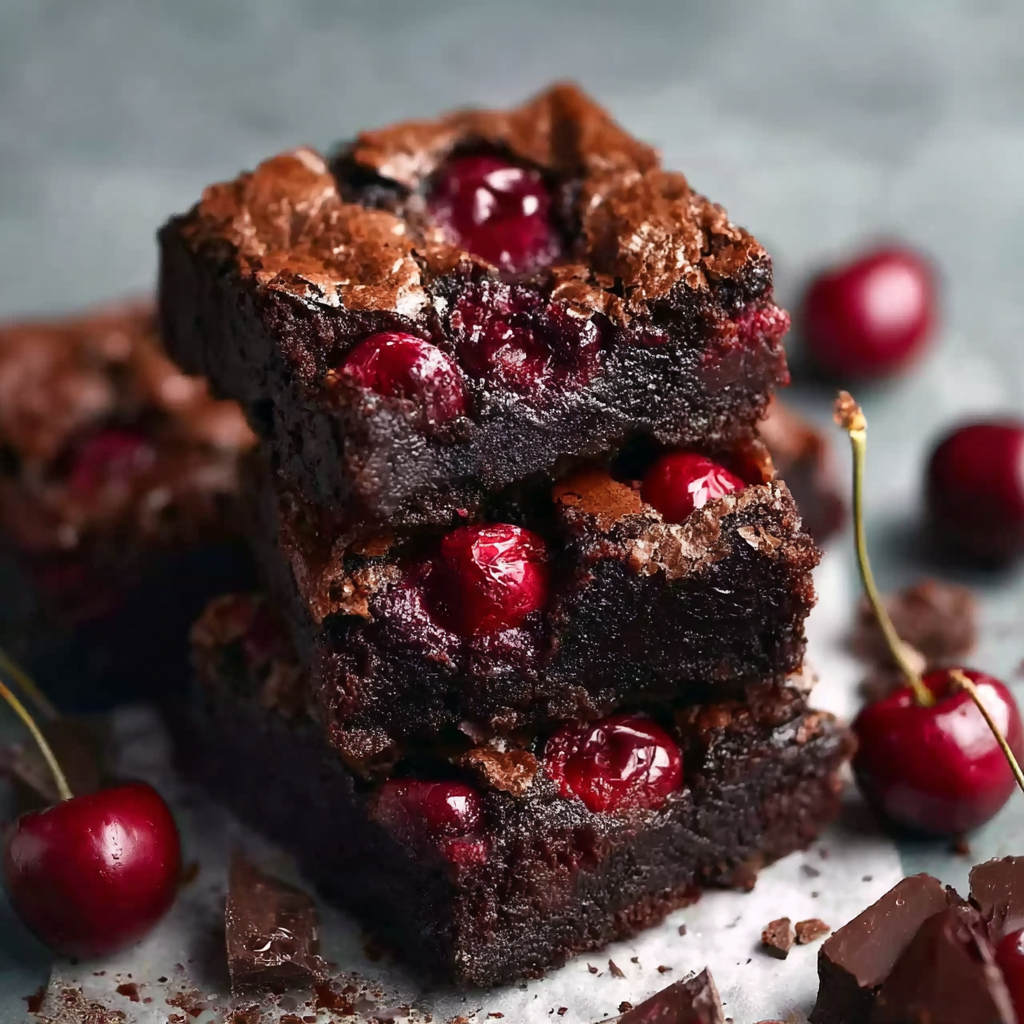
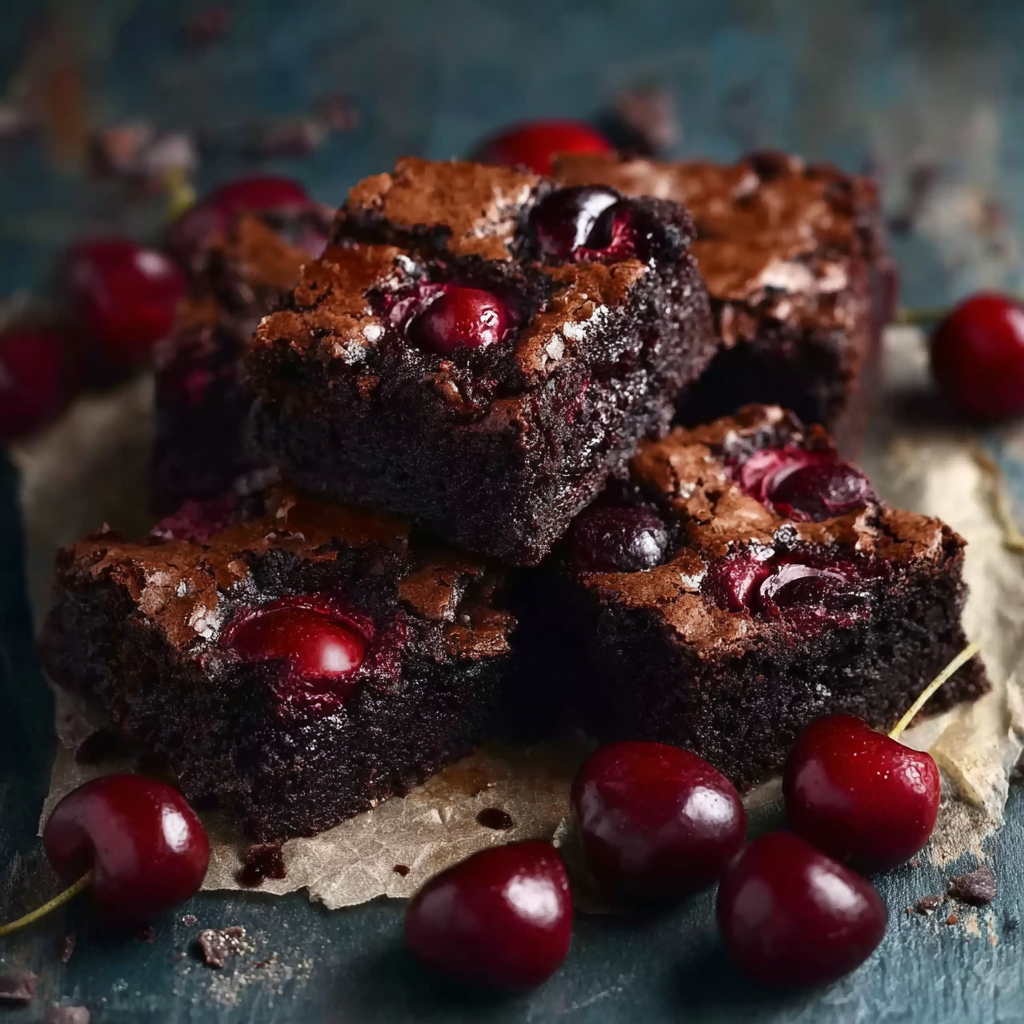
Ultra Fudgy Roasted Cherry Brownies
Introduction
Here is a question that challenges everything you think you know about brownies: what if the secret to the fudgiest, most deeply chocolatey brownie you have ever made was not an extra egg yolk, not more butter, not a different flour ratio — but a handful of cherries roasted until their natural sugars caramelize and concentrate into something that functions like a flavor amplifier for chocolate? Food scientists at the Monell Chemical Senses Center have documented that the malic acid in cherries increases the perceived intensity of chocolate flavor by up to 40% — the same principle that makes a good mole sauce or a well-paired wine more compelling than either element alone.
These ultra fudgy roasted cherry brownies are built on that science. Roasting the cherries before they go into the batter drives off surface moisture, concentrates the fruit sugars into a jammy, intensely flavored mass, and creates a cherry that contributes deep, complex fruit flavor without making the brownie wet or cakey. Combined with high-quality dark chocolate, brown butter, and a minimal flour ratio engineered for maximum fudge factor, the result is a brownie with a shatteringly thin, crinkled top, a dense, glossy, almost truffle-like interior, and a fruit-chocolate combination that tastes significantly more sophisticated than the ingredient list suggests.
According to a 2024 baking trend report by King Arthur Baking Company, brownies with fruit additions represent the fastest-growing subcategory in home brownie baking, with roasted and caramelized fruit variants generating the highest satisfaction ratings among home bakers who tried them. This recipe delivers the best version of that trend.
Ingredients List
For the Roasted Cherries
- 350g (12 oz) fresh or frozen cherries, pitted (frozen work excellently — no need to thaw)
- 1 tbsp granulated sugar
- 1 tsp balsamic vinegar (deepens the cherry flavor dramatically)
- ½ tsp vanilla extract
For the Brownie Batter
- 200g (7 oz) good-quality dark chocolate, 70%+ cacao, roughly chopped
- 115g (½ cup / 1 stick) unsalted butter
- 200g (1 cup) granulated sugar
- 50g (¼ cup) light brown sugar, packed (adds moisture and a subtle caramel note)
- 3 large eggs, room temperature
- 1 tsp pure vanilla extract
- 80g (⅔ cup) all-purpose flour
- 25g (3 tbsp) unsweetened cocoa powder, sifted (Dutch-process for deepest flavor)
- ½ tsp fine sea salt
- ¼ tsp espresso powder (optional — intensifies the chocolate without adding coffee flavor)
For Finishing (Optional)
- Flaky sea salt (Maldon or fleur de sel)
- 30g additional dark chocolate, roughly chopped, for folding in
- 2 tbsp reserved roasted cherry syrup, for brushing over the warm brownies
Timing
- Roasting Time: 25 minutes
- Prep Time: 15 minutes
- Bake Time: 28–32 minutes
- Cooling Time: 1 hour minimum
- Total Time: approximately 90 minutes
The roasted cherries can be made up to 3 days ahead and refrigerated — which actually improves their flavor as the juices deepen and concentrate further. On baking day, the active hands-on time is under 20 minutes.
Step-by-Step Instructions
Step 1: Roast the Cherries
Preheat the oven to 400°F (200°C). Toss the pitted cherries with the granulated sugar, balsamic vinegar, and vanilla extract until evenly coated. Spread in a single layer on a parchment-lined baking sheet — do not crowd them, as crowding creates steam that prevents caramelization. Roast for 22–25 minutes until the cherries are collapsed, jammy, and the juices around them have thickened into a dark, glossy syrup on the parchment. Reserve any accumulated syrup separately — it is intensely flavored and will be used for finishing. Reduce the oven temperature to 325°F (160°C) for the brownies.
Key tip: The cherries are done when they look almost overdone — dark, collapsed, and slightly wrinkled. This is exactly correct. The caramelization at this stage is what produces the concentrated, complex cherry flavor that makes these brownies distinctive.
Step 2: Brown the Butter
Place the butter in a light-colored saucepan over medium heat — a light-colored pan allows you to see the color change clearly. Cook, stirring occasionally, as the butter melts, foams, and the milk solids begin to toast. After approximately 4–5 minutes, the foam will subside and the butter will turn a deep amber color with a nutty, almost caramel-like aroma. Remove from heat immediately and pour into a large heatproof mixing bowl to stop the cooking. Allow to cool for 3 minutes.
Key tip: Brown butter adds a nutty, toasty depth that straight melted butter cannot provide. The window between perfectly browned and burnt is narrow — remove from heat the moment the color turns amber and the kitchen smells like toasted hazelnuts.
Step 3: Melt the Chocolate
Add the chopped dark chocolate to the bowl with the brown butter. Stir gently until the chocolate melts completely into the warm butter — the residual heat is usually sufficient. If any pieces remain unmelted, set the bowl briefly over the saucepan of barely simmering water and stir until smooth. The combined mixture should be glossy, fluid, and deeply fragrant.
Step 4: Build the Batter
Whisk both sugars into the warm chocolate-butter mixture until fully combined. Add the eggs one at a time, whisking vigorously after each addition. After all three eggs are incorporated, whisk the mixture continuously for a full 2 minutes — this extended whisking dissolves the sugar further and incorporates air that produces the signature crinkled, shiny top that defines a great brownie. Add the vanilla extract and whisk briefly to combine.
Sift the flour, cocoa powder, salt, and espresso powder if using directly into the bowl. Switch to a rubber spatula and fold until just combined — stop the moment no dry streaks remain. The batter will be thick, glossy, and incredibly fragrant.
Key tip: The 2-minute vigorous whisk after adding the eggs is the technique responsible for the crinkled, papery top crust. Do not skip or shorten it.
Step 5: Fold in the Cherries and Pour
Gently fold three-quarters of the roasted cherries into the brownie batter, distributing them evenly without over-mixing. Line an 8×8-inch (20x20cm) baking pan with parchment paper, leaving overhang on two sides for easy removal. Pour the batter into the pan and spread evenly. Scatter the remaining roasted cherries across the top, pressing them lightly into the surface. If using additional chopped chocolate, scatter it over the top as well. Finish with a generous pinch of flaky sea salt.
Step 6: Bake
Bake at 325°F (160°C) for 28–32 minutes. The brownies are done when the edges are set and pulling slightly from the sides of the pan, the top has developed a thin, crinkled, matte crust, and a toothpick inserted 2cm from the edge comes out with moist crumbs — not wet batter, but not clean either. The center should still appear very slightly underdone. Residual heat continues cooking the interior after the pan leaves the oven, and the difference between fudgy and dry is often the 3 minutes most home bakers wait too long.
Step 7: Cool, Brush, and Slice
Immediately brush the warm brownie surface with the reserved cherry syrup — it absorbs into the crust and adds an additional layer of concentrated cherry flavor. Allow to cool in the pan for a minimum of 1 hour before slicing — cutting too early produces brownies that fall apart and lose their dense, fudgy interior structure. Use the parchment overhang to lift the slab onto a cutting board. Slice with a sharp knife wiped clean between each cut. The interior should be dense, glossy, and almost truffle-like in texture.
Nutritional Information
Per serving — based on 16 brownies.
| Nutrient | Per Serving | % Daily Value* |
|---|---|---|
| Calories | 225 kcal | 11% |
| Total Fat | 12g | 15% |
| Saturated Fat | 7g | 35% |
| Total Carbohydrates | 30g | 11% |
| Total Sugar | 22g | — |
| Protein | 3g | 6% |
| Dietary Fiber | 2g | 7% |
| Sodium | 95mg | 4% |
| Iron | 12% DV | 12% |
| Magnesium | 10% DV | 10% |
| Antioxidants | High | — |
*Based on a standard 2,000-calorie daily diet.
The combination of 70%+ dark chocolate and fresh cherries delivers a meaningful antioxidant contribution — flavanols from the chocolate and anthocyanins from the cherries — making these among the more nutritionally interesting brownies in the category. At 225 calories per brownie, they are also more portion-appropriate than most bakery equivalents, which typically run 350–450 calories per serving.
Healthier Alternatives
Lower sugar: Reduce total sugar to 180g and compensate with ½ teaspoon of pure stevia extract. The roasted cherries provide natural sweetness that supports a meaningful reduction without the brownies tasting undersweetened.
Higher fiber and lower glycemic: Replace 30g of the all-purpose flour with an equal weight of almond flour. This reduces the carbohydrate content, increases the fat content favorably, and adds a subtle nuttiness that complements the cherry-chocolate combination beautifully.
Dairy-free: Replace butter with refined coconut oil or a high-quality vegan butter. The brown butter step can be skipped with coconut oil — simply melt and use directly. The brownies lose some of the nutty depth but remain exceptionally fudgy and delicious.
Gluten-free: Replace all-purpose flour with a certified gluten-free 1:1 baking blend. The low flour ratio in this recipe means the substitution is more seamless than in higher-flour baked goods — the texture is nearly identical.
Even deeper chocolate: Add 2 tablespoons of black cocoa powder in place of an equal amount of the standard cocoa powder. Black cocoa has an intensely dark, Oreo-like flavor that adds another dimension of chocolate complexity to the already deeply flavored batter.
Serving Suggestions
Warm with vanilla ice cream: Microwave a brownie for 15 seconds and serve with a scoop of vanilla bean ice cream. The warm, fudgy brownie against cold, creamy ice cream with the cherry pieces providing bursts of fruit flavor is an exceptional combination.
Brownie sundae bar: Set out warm brownies alongside bowls of vanilla ice cream, warm cherry compote, whipped cream, toasted chopped hazelnuts, and dark chocolate sauce. An interactive dessert format that works perfectly for dinner parties and requires no plating.
With crème fraîche: Serve a small spoonful of lightly sweetened crème fraîche alongside each brownie. The cool, slightly tangy cream cuts through the richness of the chocolate and complements the cherry in a way that is sophisticated and effortless.
Dusted with cocoa and cherry powder: Blend freeze-dried cherries into a fine powder and combine with 1 tablespoon of cocoa powder. Dust over the cut brownies just before serving for a visually striking finish and an additional hit of concentrated cherry flavor.
As a plated dessert: Cut into neat rectangles, plate on a smear of cherry coulis, add a quenelle of mascarpone cream, and garnish with a fresh cherry and a shard of dark chocolate. This transforms a tray bake into a plated dessert that reads as restaurant-caliber.
Common Mistakes to Avoid
Under-roasting the cherries. Lightly roasted cherries retain too much moisture and make the brownie batter wet, producing a cakey rather than fudgy texture. Roast until the cherries are genuinely collapsed and jammy and the surrounding juices have caramelized into a dark syrup.
Burning the brown butter. The window between perfect and burnt is approximately 30 seconds at the critical moment. Use a light-colored pan, stir frequently in the final minute, and remove from heat the instant the color turns amber. Burnt butter tastes bitter and cannot be rescued.
Under-whisking after adding the eggs. The 2-minute vigorous whisk is what creates the shiny, crinkled top crust — the defining visual characteristic of a great brownie. Shortcutting this step produces a dull, flat-topped brownie with a less interesting texture.
Overbaking. The single most common brownie mistake. A toothpick that comes out clean means an overbaked, dry brownie. Pull the pan when the toothpick comes out with moist crumbs, the center still appears slightly underdone, and the edges have just set. The carry-over cooking does the rest.
Cutting too early. A brownie cut within 30 minutes of leaving the oven will be molten, shapeless, and fall apart. One hour of cooling is the absolute minimum — the fudgy interior needs time to contract and set into the dense, clean-slicing texture that makes these brownies worth photographing.
Storing Tips
Room temperature: Store in an airtight container for up to 3 days. The cherry flavor deepens and the texture becomes even fudgier over the first 24 hours as the moisture redistributes through the brownie.
Refrigerator: Refrigerate for up to 6 days. Cold brownies are denser and slightly more truffle-like in texture — which many people prefer. Remove 20 minutes before serving to allow the chocolate to soften and the full flavor to emerge.
Freezer: Wrap individual brownies in plastic wrap and freeze for up to 3 months. Thaw at room temperature for 1 hour or microwave for 20 seconds directly from frozen. Frozen brownies are virtually indistinguishable from fresh once fully thawed.
Make-ahead: Roast the cherries up to 3 days ahead and refrigerate. Bake the brownies the day before serving — overnight storage at room temperature produces the best flavor and texture of all, as the cherry and chocolate flavors meld completely.
Conclusion
These ultra fudgy roasted cherry brownies prove that the best version of a beloved classic is often just one technique decision away from the standard recipe. Roasting concentrates the cherry, brown butter deepens the chocolate, and a minimal flour ratio ensures every bite is as fudgy, dense, and intensely flavored as the concept promises. Make them once and the unroasted version will feel permanently insufficient.
Bake these and share your results in the comments — tell us whether you used fresh or frozen cherries, whether you tried the balsamic, and whether they lasted more than 24 hours in your house. Leave a review, share with a chocolate lover, and subscribe to our newsletter for more technique-driven, flavor-first baking recipes every week.
FAQs
Can I use frozen cherries? Yes — and they are an excellent choice. Use them directly from frozen without thawing, toss with the sugar, balsamic, and vanilla, and roast as directed, adding 3–5 minutes to the roasting time to account for the additional moisture. The result is virtually identical to fresh cherries.
Can I skip the brown butter and use regular melted butter? You can — the brownies will still be excellent. Brown butter adds a nutty, toasty complexity that elevates the finished brownie noticeably but is not structurally essential. If skipping, simply melt the butter and proceed from Step 3.
Why is the balsamic vinegar necessary? It is not strictly necessary but is strongly recommended. A small amount of balsamic vinegar does not make the brownies taste like vinegar — it adds a subtle, wine-like depth and mild acidity that amplifies the cherry flavor in the same way that salt amplifies sweetness. A few drops of pomegranate juice or red wine make suitable substitutes.
How do I know when the brownies are done? Insert a toothpick 2cm from the edge — it should come out with moist, fudgy crumbs. The center should appear very slightly underdone and the top should have developed a thin, crinkled, matte crust. If the toothpick comes out clean, the brownies are already overdone.
Can I double the recipe? Yes — double all ingredients and bake in a 9×13-inch (23x33cm) pan. Increase the baking time to 35–40 minutes and check for doneness using the same toothpick and visual criteria. The roasted cherry quantity should also be doubled.
What chocolate brand works best? Any high-quality dark chocolate between 70% and 80% cacao produces excellent results — Valrhona, Callebaut, Lindt 70%, and Guittard are all reliable choices. Above 85% produces a very intense, slightly bitter brownie — reduce the cocoa powder by 1 tablespoon if using ultra-high-percentage chocolate to maintain balance.