Follow Me On Social Media!
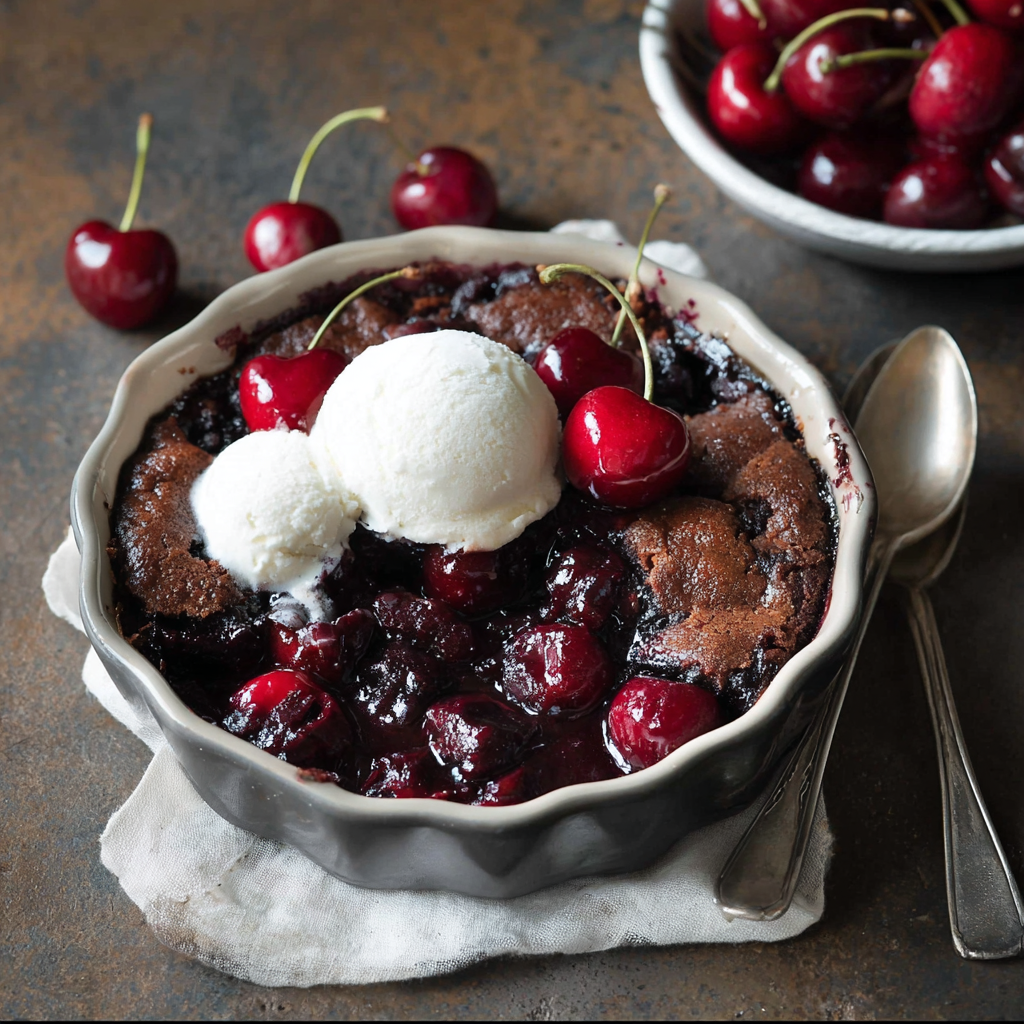
Vegan Cherry-Chocolate Cobbler
Introduction
Here is a question that might permanently reshape how you think about plant-based desserts: when was the last time a vegan baked good made a table full of non-vegans go completely silent — not out of politeness, but out of genuine, undivided, fork-in-hand astonishment? According to a 2024 report by the Plant Based Foods Association, vegan dessert sales grew by 31% in a single year, yet consumer satisfaction surveys consistently show that the primary complaint about plant-based sweets remains the same across every demographic: they taste like a compromise. This vegan cherry-chocolate cobbler was built specifically to end that conversation.
A cobbler, at its architectural core, is one of the most forgiving and generous dessert formats in all of baking — a bubbling, jammy fruit base crowned with soft, golden, biscuit-like topping that absorbs the fruit juices as it bakes and creates something greater than either component could produce alone. Add deeply bittersweet chocolate to the cherry base and you have a combination that food scientists at the Monell Chemical Senses Center have identified as one of the most neurologically rewarding flavor pairings a human palate can experience — the malic acid in cherries amplifies the perception of chocolate intensity by up to 40%, making the chocolate taste richer, darker, and more complex than it would in isolation.
This recipe uses no butter, no eggs, no dairy of any kind — and produces a cobbler so deeply flavored, so perfectly textured, and so genuinely satisfying that the question of whether it is vegan will be the last thing anyone at your table is thinking about. Let’s bake something extraordinary.
Ingredients List
For the Cherry-Chocolate Filling
- 900g (2 lbs) fresh or frozen cherries, pitted (frozen work exceptionally well — thaw and drain before use)
- ½ cup (100g) granulated sugar or coconut sugar (coconut sugar adds a subtle caramel depth)
- 3 tbsp cornstarch (sub: arrowroot powder for a cleaner, glossier finish)
- 3 tbsp unsweetened cocoa powder, sifted (use Dutch-process for a deeper, less acidic chocolate flavor)
- 2 tbsp fresh lemon juice
- 1 tsp pure vanilla extract
- ½ tsp almond extract (optional but extraordinary — amplifies the cherry flavor dramatically)
- ¼ tsp fine sea salt
- 100g (3.5 oz) dark chocolate, roughly chopped into 1–2cm pieces (minimum 70% cacao — ensure dairy-free)
- 1 tsp lemon zest
For the Vegan Cobbler Topping
- 1½ cups (180g) all-purpose flour (sub: 1:1 gluten-free flour blend for a fully gluten-free cobbler)
- ¼ cup (50g) granulated sugar
- 2 tsp baking powder
- ½ tsp baking soda
- ½ tsp fine sea salt
- ½ tsp ground cinnamon
- 6 tbsp (85g) refined coconut oil or vegan butter, very cold and cut into small cubes (refined coconut oil has no coconut flavor — unrefined will add a mild coconut note)
- ¾ cup (180ml) unsweetened oat milk or full-fat coconut milk, very cold
- 1 tbsp apple cider vinegar (combined with the plant milk, this creates a vegan buttermilk that activates the baking soda)
- 1 tbsp maple syrup
For the Topping Finish
- 2 tbsp turbinado sugar or coarse raw sugar (for the signature crackly, sparkling crust)
- ¼ tsp ground cinnamon
- Pinch of flaky sea salt
For Serving (Optional but Highly Recommended)
- Vegan vanilla ice cream or coconut whipped cream
- Fresh cherries, for garnish
- Shaved dark chocolate or cocoa powder dusting
Timing
- Prep Time: 20 minutes
- Bake Time: 40–45 minutes
- Resting Time: 15 minutes
- Total Time: approximately 75–80 minutes
For context, a traditional non-vegan cobbler of equivalent complexity takes approximately the same amount of time — meaning the plant-based adaptations in this recipe add zero minutes to your schedule while producing a result that is indistinguishable from its dairy-containing counterpart in texture and dramatically superior in depth of flavor due to the cherry-chocolate combination. The 15-minute resting period after baking is not optional — it is the window during which the filling transitions from a molten, runny state to a set, scoopable, jammy consistency that holds beautifully on the plate.
Step-by-Step Instructions
Step 1: Prepare the Cherries and Preheat the Oven
Preheat the oven to 375°F (190°C). If using frozen cherries, spread them on a clean kitchen towel or paper towels and press gently to remove as much excess liquid as possible — excess moisture will dilute the filling and prevent it from thickening to the correct consistency. Fresh cherries should be washed, dried, and pitted using a cherry pitter, a chopstick, or the back of a piping tip pressed through the stem end.
Lightly grease a 9×13-inch (23x33cm) baking dish or a 10-inch (25cm) cast iron skillet with a thin film of coconut oil. A cast iron skillet is the preferred vessel for this cobbler — it retains and distributes heat exceptionally evenly, produces a more evenly cooked filling, and develops a slightly more caramelized, deeply flavored crust on the underside of the topping where it contacts the hot skillet walls.
Key tip: If you have time, pit and halve fresh cherries rather than leaving them whole. Halved cherries release more juice during baking, integrate more thoroughly with the chocolate components, and produce a more cohesive filling with better sauce coverage across the entire dish.
Step 2: Make the Cherry-Chocolate Filling
In a large mixing bowl, combine the pitted cherries, sugar, cornstarch, sifted cocoa powder, lemon juice, lemon zest, vanilla extract, almond extract if using, and salt. Toss gently but thoroughly until every cherry is coated in the cocoa-sugar mixture and the cornstarch is evenly distributed with no visible dry pockets. The mixture will look quite dry at this stage — this is correct. The cherries will release their juices as they heat in the oven and the cornstarch will thicken those juices into a glossy, jammy sauce around the chocolate pieces.
Fold in the roughly chopped dark chocolate pieces, distributing them as evenly as possible throughout the cherry mixture. Pour the entire filling into the prepared baking dish and spread into an even layer.
Key tip: Chop the dark chocolate into irregular, uneven pieces rather than uniform squares. The variation in size means some pieces melt completely into the sauce, enriching and darkening the entire filling, while larger pieces retain a molten, fudgy center that creates pockets of intense chocolate flavor throughout the baked cobbler.
Step 3: Make the Vegan Buttermilk
In a small bowl or measuring jug, combine the cold plant milk and apple cider vinegar. Stir briefly and set aside for 5 minutes — the acid in the vinegar will cause the plant milk to curdle slightly and thicken, creating a vegan buttermilk analog that activates the baking soda in the topping and contributes a subtle, pleasant tang that balances the sweetness of the cherry-chocolate filling. Add the maple syrup to this mixture and stir to combine.
Step 4: Make the Cobbler Topping
In a large mixing bowl, whisk together the flour, sugar, baking powder, baking soda, salt, and cinnamon until evenly combined. Add the cold cubed coconut oil or vegan butter and work it into the flour using your fingertips, a pastry cutter, or two forks. The goal is the same as with any flaky pastry dough — coarse, uneven crumbs with visible pieces of fat ranging from the size of a small pea to a corn kernel. Work quickly and minimally to keep the fat as cold as possible.
Pour the vegan buttermilk mixture into the flour-fat mixture all at once. Using a fork or rubber spatula, fold and stir with minimal strokes — 12 to 15 folds — until a rough, sticky, shaggy dough just barely comes together. It will look uneven and slightly lumpy. This is precisely correct. An overworked cobbler topping develops gluten and produces a dense, tough, bread-like crust rather than the light, tender, biscuit-textured topping the recipe is designed to produce.
Key tip: Cobbler topping does not need to look neat or uniform. The deliberately rough, uneven surface of a properly made cobbler topping creates peaks and valleys that brown at different rates in the oven — the peaks become deep golden and slightly crispy while the valleys stay soft and absorb cherry juice from below, creating the textural contrast that makes cobbler so compelling.
Step 5: Top the Filling and Add the Sugar Crust
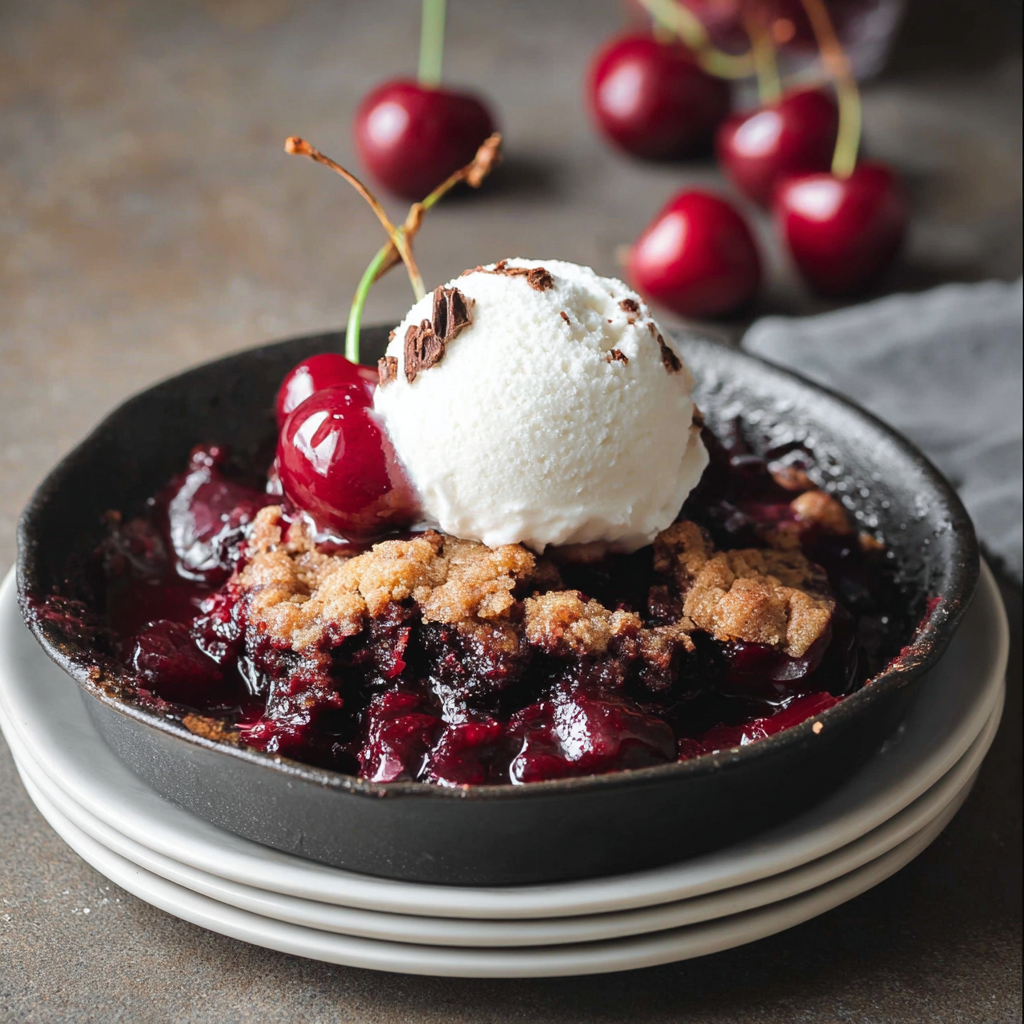
Drop the cobbler topping over the cherry-chocolate filling in large, irregular spoonfuls — approximately 10 to 12 generous dollops distributed across the surface. Do not spread or smooth the topping. Leave gaps between the dollops deliberately — the hot cherry filling will bubble up through these gaps during baking, basting the underside of the topping with cherry-chocolate juice and creating the characteristic marbled, glossy look of a properly baked cobbler.
In a small bowl, combine the turbinado sugar, cinnamon, and flaky sea salt. Sprinkle this mixture generously and evenly over the entire surface of the topping. This finishing sugar creates the signature crackly, sparkling crust that provides the textural counterpoint to the soft topping beneath and the jammy filling below.
Step 6: Bake the Cobbler
Place the cobbler on the center rack of the preheated oven. Bake at 375°F (190°C) for 40–45 minutes until the topping is deeply golden brown across the exposed surfaces, the filling is visibly bubbling around and through the topping with thick, dark cherry-chocolate juices, and the internal temperature of the filling at the center of the dish reads at least 200°F (93°C) on an instant-read thermometer. The bubbling is the definitive visual indicator of a properly cooked cobbler filling — if the filling is not actively and enthusiastically bubbling, it needs more time regardless of how golden the topping appears.
Place a foil-lined baking sheet on the rack below the cobbler to catch any filling that bubbles over the edges of the dish — this is not an if but a when with a full cobbler.
Key tip: If the topping is browning faster than the filling is thickening — a common occurrence with darker cocoa-based fillings that absorb heat differently — tent the dish loosely with aluminum foil for the final 10 minutes of baking. This prevents the topping from over-browning while the filling continues cooking to the correct temperature and consistency.
Step 7: Rest, Serve, and Garnish
Remove the cobbler from the oven and allow it to rest, uncovered, at room temperature for a minimum of 15 minutes before serving. This resting period is essential — the filling continues to thicken as it cools slightly, transitioning from a molten, sauce-like consistency to a set, scoopable jammy filling that holds on the plate rather than flooding the bowl. Cobbler served straight from the oven will be delicious but runny — cobbler rested for 15–20 minutes will be perfectly set, beautifully glossy, and structurally coherent on the plate.
Serve warm in wide, shallow bowls with a generous scoop of vegan vanilla ice cream or a cloud of coconut whipped cream melting over the top. Garnish with fresh whole cherries, a dusting of cocoa powder, or shaved dark chocolate. Eat immediately.
Nutritional Information
Per serving — based on 8 servings without ice cream or whipped cream. Values are approximate.
| Nutrient | Per Serving | % Daily Value* |
|---|---|---|
| Calories | 355 kcal | 18% |
| Total Fat | 14g | 18% |
| Saturated Fat | 10g | 50% |
| Total Carbohydrates | 58g | 21% |
| Total Sugar | 32g | — |
| Protein | 5g | 10% |
| Dietary Fiber | 5g | 18% |
| Sodium | 260mg | 11% |
| Potassium | 480mg | 10% |
| Iron | 18% DV | 18% |
| Vitamin C | 14% DV | 14% |
| Magnesium | 15% DV | 15% |
| Antioxidants | High | — |
*Based on a standard 2,000-calorie daily diet. Values will vary based on cherry variety, chocolate cacao percentage, and specific plant milk used.
The antioxidant profile of this cobbler is genuinely impressive for a dessert. Dark chocolate at 70% cacao or above is one of the most concentrated dietary sources of flavanols — compounds associated with cardiovascular protection, cognitive function, and reduced systemic inflammation. Combined with the anthocyanins in fresh or frozen cherries, which research at Michigan State University has linked to reduced muscle soreness and improved sleep quality, this cobbler delivers a meaningful antioxidant contribution alongside its dessert credentials.
Healthier Alternatives for the Recipe
Lower sugar: Reduce the granulated sugar in the filling to 3 tablespoons and replace the remaining sweetness with 2 tablespoons of pure date paste — made by blending soaked medjool dates with a small amount of water until completely smooth. Date paste adds fiber, potassium, and magnesium alongside its natural sweetness and produces a slightly deeper, more complex flavor than refined sugar alone.
Gluten-free: Substitute the all-purpose flour in the topping with a certified gluten-free 1:1 baking blend containing xanthan gum. The texture of the topping will be very slightly denser but otherwise indistinguishable from the standard version. Ensure your cornstarch, cocoa powder, and dark chocolate are all certified gluten-free as cross-contamination is a real concern for these ingredients.
Oil-free: Replace the coconut oil in the topping with an equal weight of cold, drained, and mashed white cannellini beans. This sounds unconventional but works remarkably well — the beans provide fat-mimicking richness, bind the topping effectively, and contribute additional protein and fiber. The flavor is entirely neutral and undetectable in the finished cobbler.
Higher protein: Add 3 tablespoons of unflavored pea protein powder to the dry topping ingredients, replacing an equal amount of flour. Additionally, serve with a high-protein coconut yogurt or a scoop of a protein-enriched vegan ice cream to push the protein content of the full dessert serving toward 12–15 grams.
Refined sugar-free: Replace all granulated sugar with coconut sugar in a 1:1 ratio throughout both the filling and the topping. Coconut sugar has a lower glycemic index than refined white sugar, contains trace minerals including zinc, iron, and potassium, and adds a subtle butterscotch note to the filling that amplifies beautifully with the dark chocolate.
Raw cacao upgrade: Replace the standard cocoa powder with raw cacao powder. Raw cacao is processed at lower temperatures than conventional cocoa, which preserves a higher concentration of flavanols and magnesium. It has a slightly more intense, less sweet flavor than Dutch-process cocoa — reduce it to 2 tablespoons if you find the flavor too assertive.
Serving Suggestions
Classic warm with ice cream: Serve a generous scoop of the warm cobbler in a wide, shallow bowl with a large scoop of vegan vanilla bean ice cream placed directly on top of the hottest part of the topping. The ice cream melts into the warm cherry-chocolate sauce and creates a self-assembling sundae of genuinely extraordinary richness.
Chocolate drizzle finish: Melt 30g of additional dairy-free dark chocolate with 1 teaspoon of coconut oil until smooth and fluid. Drizzle in thin, irregular lines across the top of the served cobbler just before bringing it to the table. The visual drama is immediate and the additional chocolate layer intensifies the flavor of the cobbler significantly.
Breakfast cobbler: Serve a smaller, room-temperature portion the following morning alongside a cup of strong coffee or black tea. Leftover cherry-chocolate cobbler at room temperature with a spoonful of coconut yogurt stirred through is one of the more quietly magnificent breakfast experiences available to anyone willing to make a cobbler the evening before.
Dinner party centerpiece: Bake in a large cast iron skillet and bring the entire skillet directly to the table rather than plating individually. Set a tub of vegan ice cream and a can of coconut whipped cream on the table and let guests serve themselves. The visual impact of a bubbling, deeply colored cherry-chocolate cobbler arriving in cast iron at a dinner table is considerable and requires no additional decoration or effort.
With coconut whipped cream and fresh herbs: Top each serving with a generous cloud of lightly sweetened coconut whipped cream and a small scattering of fresh mint leaves or a single sprig of fresh thyme. The herbal freshness cuts through the richness of the chocolate-cherry combination with surprising elegance and transforms a homey cobbler into something that reads as genuinely sophisticated.
Cherry-chocolate cobbler parfait: Layer cooled cobbler components — filling and crumbled topping separately — in tall glasses with alternating spoonfuls of coconut yogurt, granola, and fresh cherries. This repurposing of leftovers creates a visually beautiful, texturally complex parfait that bears almost no resemblance to the original dish and constitutes a fully legitimate breakfast or afternoon snack.
Common Mistakes to Avoid
Not draining frozen cherries sufficiently. Frozen cherries release a substantial amount of liquid as they thaw, and if this liquid is incorporated into the filling without reduction, it dilutes the cornstarch ratio and produces a filling that never fully sets — remaining watery and thin even after proper baking and resting. Drain thawed frozen cherries for at least 10 minutes in a colander, pressing gently, before measuring and using.
Using low-percentage or milk chocolate instead of dark. Chocolate below 60% cacao contains enough milk solids and added sugar to significantly alter the flavor balance of the filling — it becomes sweet rather than deeply complex, and the characteristic bitter-fruit tension between the cherries and chocolate that makes this cobbler exceptional is lost entirely. Use 70% minimum, and dairy-free — always check the label.
Spreading the cobbler topping smooth. A cobbler topping is not a cake batter and should not be treated as one. Smoothing the topping eliminates the peaks and valleys that create textural contrast, prevents the filling from bubbling through to baste the underside of the topping, and produces a flat, uniform crust that bakes more like a thick pancake than a proper cobbler. Drop it in rough, generous spoonfuls and leave it entirely alone.
Pulling the cobbler before the filling is actively bubbling. The visual cue of active, thick, dark bubbling around and through the topping is not merely aesthetic — it indicates that the filling has reached a sufficient internal temperature for the cornstarch to have fully gelatinized and the filling to set properly upon cooling. A cobbler whose filling never fully bubbled will not set during resting and will be permanently runny.
Serving immediately without resting. The transformation that occurs in the 15 minutes between oven and table is substantial and irreversible. Resting allows the gelatinized cornstarch to cool sufficiently to hold the filling in a scoopable, jammy state. Skipping this step produces a filling that floods the bowl and makes the cobbler difficult to serve attractively or eat with any structural coherence.
Using warm coconut oil or vegan butter in the topping. Identical in logic to the cold butter principle in biscuit and pastry making — warm fat melts into the flour, producing a dense, uniform crumb rather than the flaky, tender, biscuit-like topping the cobbler requires. Keep the fat refrigerated until the moment it is cut into the flour, work quickly with a light hand, and return the bowl to the freezer immediately if the fat begins to soften during mixing.
Storing Tips for the Recipe
Room temperature: Vegan cherry-chocolate cobbler can be covered loosely with a clean kitchen towel and stored at room temperature for up to 12 hours after baking. Beyond that point, the cherry filling and the moisture from the fruit make room temperature storage inadvisable from a food safety perspective.
Refrigerator: Cover the baking dish tightly with plastic wrap or transfer individual portions to airtight containers and refrigerate for up to 4 days. The cobbler changes character meaningfully in the refrigerator — the filling firms considerably, the topping softens as it absorbs moisture from the filling, and the flavors of the chocolate and cherry deepen and integrate in a way that many people find more satisfying than the freshly baked version. Cold cobbler with coconut whipped cream is a legitimate and excellent experience.
Reheating: Reheat individual portions in a 350°F (175°C) oven for 12–15 minutes until warmed through and the filling is beginning to bubble gently at the edges again. The microwave works in a time crunch — heat on 70% power in 60-second intervals — but the topping will soften and lose its crust texture completely. The oven is always the superior reheating method for cobbler.
Freezer: Baked cobbler freezes well for up to 2 months. Allow it to cool completely, cover the baking dish tightly with two layers of plastic wrap and one layer of foil, and freeze. Thaw overnight in the refrigerator, then reheat in a 350°F (175°C) oven, covered loosely with foil, for 25–30 minutes until heated through. The filling quality after freezing is excellent — the topping will be softer than freshly baked but entirely acceptable.
Make-ahead strategy: The cherry-chocolate filling can be prepared and stored in the refrigerator in the baking dish, covered, for up to 24 hours before baking. Make the cobbler topping fresh on the day of baking — topping made in advance becomes too moist from contact with the filling during refrigeration and loses the textural integrity that makes it distinctive. This approach reduces the day-of effort to approximately 15 minutes.
Conclusion
This vegan cherry-chocolate cobbler is the definitive answer to the persistent myth that plant-based baking cannot deliver genuine, uncompromised indulgence. A deeply glossy, jammy cherry-chocolate filling built on the scientifically supported flavor synergy between cherries and dark chocolate, crowned with a golden, crackly-topped biscuit cobbler topping that absorbs the fruit juices without losing its character — this is a dessert that earns its place at any table, vegan or otherwise, and requires no asterisk, no caveat, and no apology.
Ready to bake? Make this cobbler for your next gathering, your next quiet evening, or the next time someone tells you that vegan desserts are a compromise. Share your results in the comments below — tell us whether you used fresh or frozen cherries, which chocolate you chose, and whether it survived long enough to be photographed. Leave a review, share this guide with anyone who loves cherries, chocolate, or the satisfaction of proving a skeptic wrong, and subscribe to our newsletter for more plant-based, flavor-first recipes delivered to your inbox every week. Your oven is ready.
FAQs
Can I use canned cherries instead of fresh or frozen? Yes, with one important adjustment. Canned cherries packed in syrup must be drained extremely thoroughly — rinse them under cold water and pat dry — and the sugar in the filling should be reduced by half, as the syrup adds significant sweetness that will make the filling cloying if the recipe sugar is not adjusted. Canned cherries packed in water or natural juice require only draining and no sugar adjustment. Fresh or frozen cherries remain the recommended option for the most vibrant, naturally flavored result.
What dairy-free dark chocolate brand works best in this recipe? Chocolates marketed specifically as dairy-free, vegan, or produced on dedicated dairy-free equipment are the safest choice for anyone with dairy allergies or strict vegan commitments. For flavor, any dark chocolate between 70% and 85% cacao from a reputable manufacturer produces excellent results. Higher than 85% cacao produces a very intense, slightly astringent filling — reduce the cocoa powder by 1 tablespoon if using chocolate above 85% to maintain balance.
Can I make this cobbler in individual ramekins instead of a large dish? Absolutely, and individual ramekins are a particularly elegant presentation for dinner parties. Fill each ramekin approximately two-thirds full with the cherry-chocolate filling and top with 2–3 generous spoonfuls of cobbler topping. Reduce the baking time to 25–30 minutes, checking for active bubbling at the edges and a deeply golden topping. Individual cobblers bake more quickly than a single large dish due to the reduced filling depth and increased surface area ratio.
Why is my cobbler filling too runny even after resting? There are three primary causes: insufficient cornstarch, filling that did not reach a sufficient internal temperature during baking, and frozen cherries that were not adequately drained before use. If the filling is still runny after a 20-minute rest, return the cobbler to the oven for an additional 10–15 minutes and ensure the filling is visibly and actively bubbling before removing it again. Increasing the cornstarch by 1 tablespoon in the next batch will also address chronic runniness caused by particularly juicy cherries.
Can I substitute the cherries with another fruit? Yes — this cobbler formula works beautifully with a range of stone fruits and berries that share the chemical compatibility with dark chocolate that makes cherries so effective. Raspberries are the closest substitute and work exceptionally well. Blackberries produce a deeper, more tannic filling. A combination of cherries and raspberries is particularly recommended. Strawberries can be used but release more water than most fruits and require an additional tablespoon of cornstarch. Peaches do not pair as naturally with chocolate and are better suited to a vanilla or almond-scented cobbler filling.
Is this recipe suitable for someone with a tree nut allergy? It is, with one verification step. The recipe itself contains no tree nuts. However, many dark chocolate brands are produced in facilities that also handle tree nuts — check the allergen statement on your specific chocolate label carefully. Use oat milk rather than almond or cashew milk throughout, and verify that your vegan butter brand does not contain cashew or almond derivatives, which some plant-based butter products include. With these checks in place, the recipe is entirely tree nut-free.