Follow Me On Social Media!
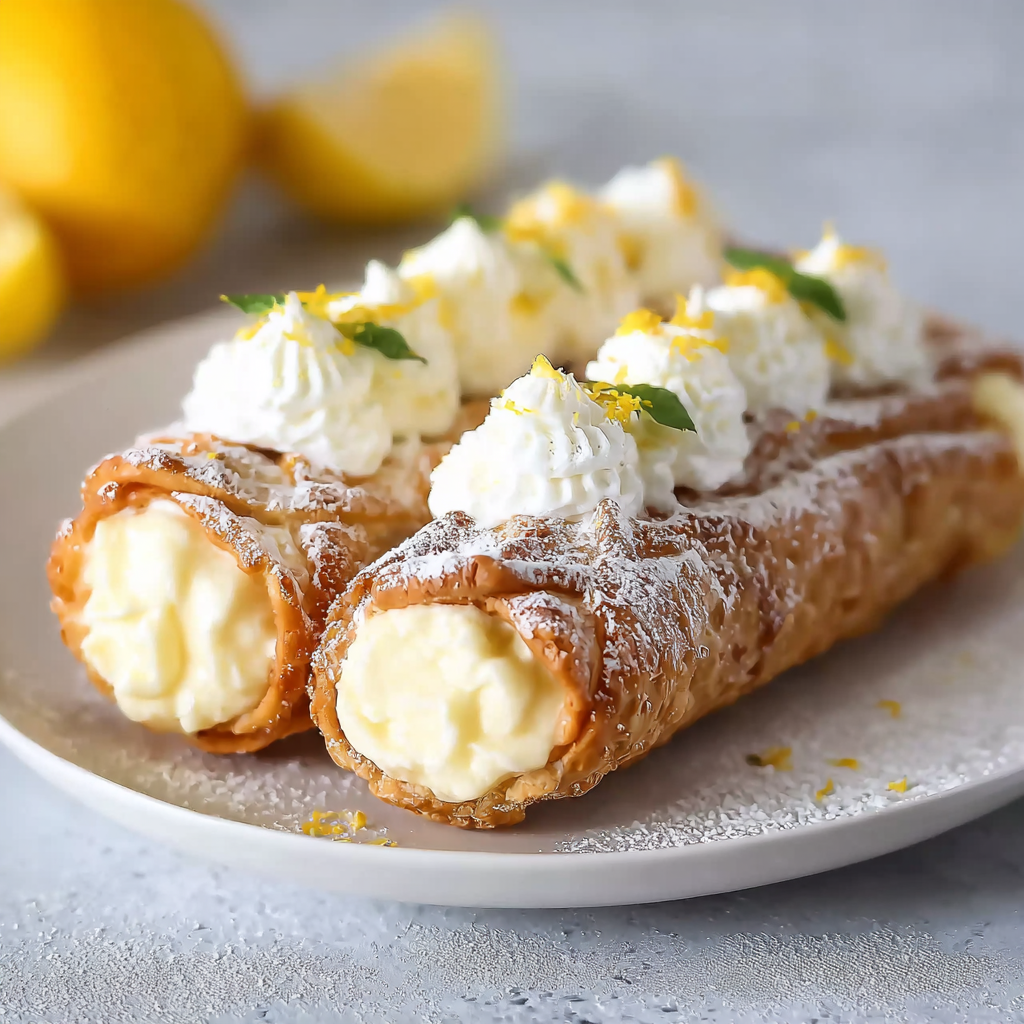
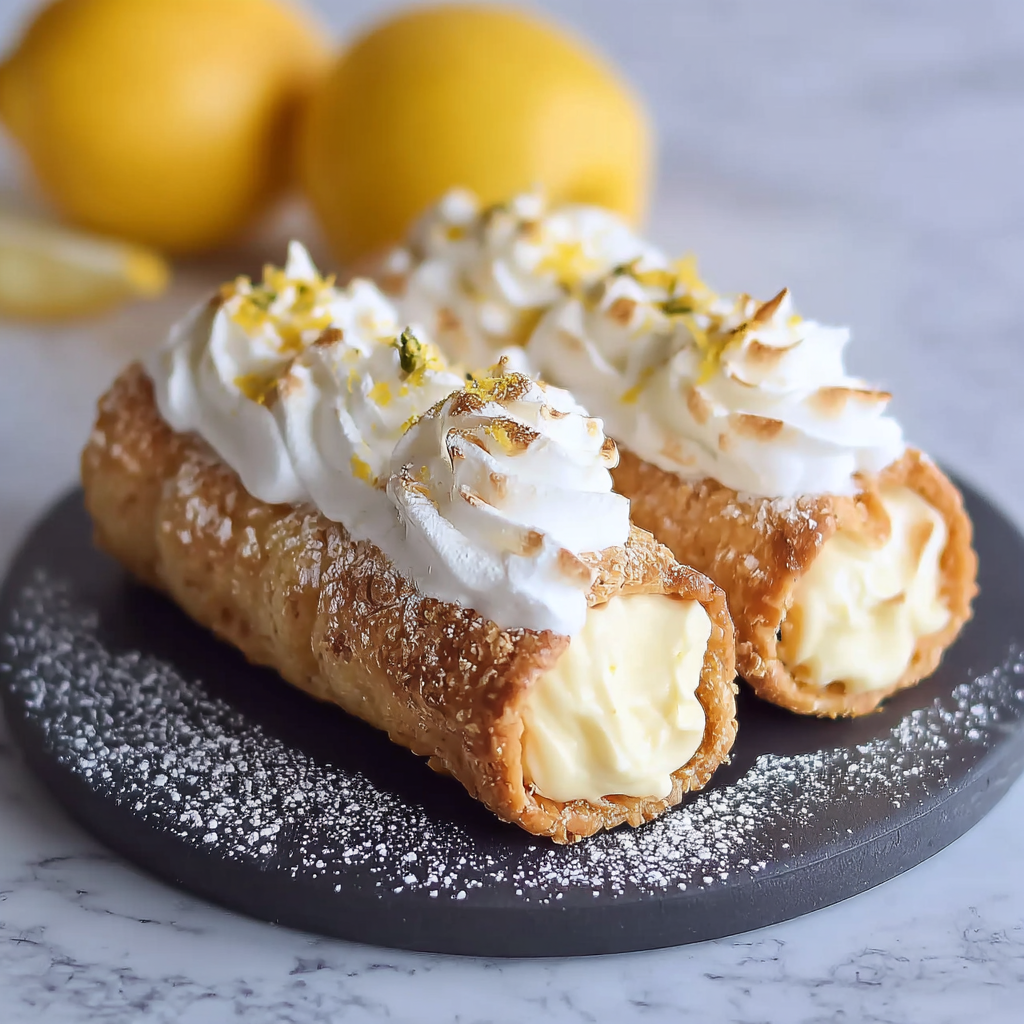
Lemon Meringue Pie Style Cannoli
Introduction
Here is a question that challenges the boundaries of two of the most beloved dessert traditions in the world: what happens when the bright, tangy, custardy soul of a lemon meringue pie — the lemon curd, the toasted meringue, the balance of sweet and sharp — is reimagined inside the crispy, golden shell of an Italian cannolo? According to a 2024 pastry trend report by the American Culinary Federation, hybrid desserts that combine the signature elements of two beloved classics represent the fastest-growing category in both professional pastry and home baking — driven by a consumer appetite for the familiar made surprising and the traditional made new.
These lemon meringue pie style cannoli deliver exactly that combination. A crispy cannoli shell — made from scratch or store-bought depending on your time and ambition — filled with a bright, intensely lemony mascarpone-curd cream, and finished with a cloud of toasted Italian meringue that caramelizes under a kitchen torch into the signature golden peaks of a classic lemon meringue pie. The result is a two-bite dessert that contains the entire flavor arc of a lemon meringue pie — citrus sharpness, creamy richness, sweet meringue — in a hand-held, individually portioned format that is more visually dramatic and more texturally interesting than the pie it references.
A 2023 consumer dessert survey by Mintel identified lemon as the number one preferred citrus flavor in desserts globally for the third consecutive year, with consumers specifically citing the balance of tartness and sweetness as the quality they find most satisfying in lemon-forward sweets. This recipe engineers that balance into every component.
Ingredients List
For the Cannoli Shells (Makes 12 shells — or use 12 store-bought)
- 200g (1⅔ cups) all-purpose flour
- 1 tbsp granulated sugar
- ½ tsp fine sea salt
- ½ tsp ground cinnamon
- 1 tbsp unsalted butter, cold and cubed
- 1 large egg yolk
- ½ cup (120ml) dry white wine or Marsala (Marsala is traditional)
- 1 tsp white wine vinegar
- Neutral oil, for deep frying (vegetable or canola)
- 1 egg white, for sealing the shells
For the Lemon Mascarpone Filling
- 250g (9 oz) full-fat mascarpone cheese, cold
- ½ cup (120ml) heavy whipping cream, very cold
- 4 tbsp good-quality lemon curd (homemade or store-bought — quality matters here)
- 2 tbsp fresh lemon juice
- 1 tbsp lemon zest
- 3 tbsp powdered sugar, sifted
- ¼ tsp fine sea salt
- ½ tsp pure vanilla extract
For the Italian Meringue Topping
- 3 large egg whites, room temperature
- 150g (¾ cup) granulated sugar
- 37ml (2½ tbsp) water
- ¼ tsp cream of tartar
- ½ tsp pure vanilla extract
For Finishing
- Extra lemon zest, for garnish
- Crushed pistachios (optional — traditional cannoli finish with a lemon complement)
- Powdered sugar, for dusting
- Small pieces of candied lemon peel (optional)
Timing
- Cannoli Dough Resting: 30 minutes
- Frying the Shells: 20 minutes
- Making the Filling: 10 minutes
- Making the Meringue: 10 minutes
- Assembly: 10 minutes
- Total Time: approximately 60 minutes (using store-bought shells reduces to 30 minutes)
Step-by-Step Instructions
Step 1: Make the Cannoli Dough (Skip if using store-bought)
Combine the flour, sugar, salt, and cinnamon in a large bowl. Rub in the cold butter with your fingertips until the mixture resembles coarse crumbs. Add the egg yolk, wine, and vinegar. Mix until a rough dough forms, then knead for 3–4 minutes until smooth and elastic. Wrap in plastic wrap and rest at room temperature for 30 minutes — resting relaxes the gluten and allows the dough to roll thin without springing back.
Step 2: Roll and Fry the Shells
Roll the rested dough on a lightly floured surface to 2mm thickness — the thinnest you can achieve without tearing. Cut into 10cm (4-inch) circles or ovals. Wrap each piece around a cannoli tube, sealing the overlapping edge with a dab of egg white pressed firmly. Heat the oil to 350°F (175°C) in a deep, heavy pot. Fry the shells — tubes and all — in batches for 2–3 minutes until deep golden and blistered. Remove with tongs, drain on paper towels, and allow to cool for 2 minutes before carefully sliding off the metal tubes. Cool completely before filling.
Key tip: The shells must be completely cool before filling — warm shells melt the mascarpone filling and make the assembly unworkable.
Step 3: Make the Lemon Mascarpone Filling
Beat the cold mascarpone, powdered sugar, vanilla extract, salt, lemon juice, and lemon zest together on medium speed for 60–90 seconds until smooth. Do not over-beat — mascarpone splits quickly under excessive mechanical action. Fold in the lemon curd until evenly marbled through the mixture. In a separate bowl, whip the cold heavy cream to soft peaks and fold into the mascarpone mixture in two additions with slow, sweeping strokes. Transfer to a piping bag fitted with a star or round tip and refrigerate until needed.
Step 4: Make the Italian Meringue
Combine the sugar and water in a small saucepan and heat over medium-high without stirring until the syrup reaches 244°F (118°C). While the syrup heats, beat the egg whites and cream of tartar on medium speed until soft, foamy peaks form. Pour the hot syrup in a slow, thin stream down the side of the bowl with the mixer running on high — never directly onto the beaters. Continue beating for 8–10 minutes until the meringue is stiff, glossy, and cooled to room temperature. Beat in the vanilla extract. Transfer to a separate piping bag fitted with a star tip.
Step 5: Fill the Cannoli
Working from both ends of each shell, pipe the lemon mascarpone filling into the center — piping from one end until resistance is felt, then completing from the other end. The filling should be visible and generous at both openings. Pipe a small rosette of Italian meringue onto each exposed filling end — the meringue crowns the filling and creates the visual reference to the pie topping.
Step 6: Toast the Meringue and Finish
Using a kitchen torch, toast the meringue rosettes at each end of the cannoli until golden, slightly blistered, and caramelized at the peaks — approximately 10–15 seconds of even torch movement per end. Work quickly and keep the torch moving to avoid burning. Immediately dust with powdered sugar, scatter extra lemon zest, and add crushed pistachios or candied lemon peel if using. Serve within 20 minutes of assembly — cannoli are at their best when the shell is still crisp and the filling is cold.
Nutritional Information
Per serving — based on 1 cannoli from a batch of 12.
| Nutrient | Per Serving | % Daily Value* |
|---|---|---|
| Calories | 285 kcal | 14% |
| Total Fat | 16g | 21% |
| Saturated Fat | 8g | 40% |
| Total Carbohydrates | 30g | 11% |
| Total Sugar | 18g | — |
| Protein | 5g | 10% |
| Dietary Fiber | 0.5g | 2% |
| Sodium | 95mg | 4% |
| Calcium | 6% DV | 6% |
| Vitamin C | 8% DV | 8% |
*Based on a standard 2,000-calorie daily diet.
Healthier Alternatives
Lower fat filling: Replace half the mascarpone with an equal weight of well-drained ricotta — the traditional cannoli filling base — which is significantly lower in fat and produces a lighter, slightly grainier filling that many cannoli purists prefer.
Lower sugar meringue: Reduce the sugar in the Italian meringue to 120g and compensate with ¼ teaspoon of pure stevia extract. The meringue will be slightly less stable but entirely pipeable and toastable.
Baked shells: Brush the wrapped dough with egg white instead of frying. Bake at 400°F (200°C) for 10–12 minutes until golden. The shells will be less blistered and slightly less crispy than fried but entirely acceptable and significantly lower in fat.
Dairy-free filling: Replace mascarpone with a cashew-based vegan cream cheese and use coconut whipped cream in place of heavy cream. A high-quality store-bought vegan lemon curd completes the filling with a comparable flavor profile.
Serving Suggestions
Dessert platter: Arrange on a long slate board with fresh lemon slices, small mint sprigs, and a dusting of powdered sugar across the entire board. This presentation reads as patisserie-level without any additional effort.
Dinner party plated dessert: Plate two cannoli per person on a smear of lemon curd, a scattering of fresh raspberries, and a dusting of freeze-dried lemon powder. A plated dessert course that competes with any restaurant equivalent.
Mini cannoli format: Roll the dough thinner and use smaller tubes to produce 24 two-bite mini cannoli — the ideal format for cocktail parties, dessert tables, and gifting.
With limoncello: Serve alongside a chilled shot of limoncello for an Italian dessert pairing of complete thematic unity. The complementary lemon flavors amplify each other across the two formats.
Common Mistakes to Avoid
Filling cannoli too far in advance. Filled cannoli become soggy within 30–45 minutes as the moisture from the filling migrates into the shell. Fill immediately before serving or at most 20 minutes ahead.
Over-beating the mascarpone. Mascarpone splits into a grainy, liquid mess if beaten too aggressively. Sixty to ninety seconds at medium speed is sufficient — stop the moment it is smooth.
Syrup too hot or too cold for the meringue. Below 240°F (116°C), the meringue will not be food-safe or stable. Above 250°F (121°C), it will begin to harden before incorporation. A candy thermometer is not optional for Italian meringue.
Not cooling the shells before filling. Warm shells melt the mascarpone on contact and produce a collapsed, loose filling that runs out of the shell rather than holding its shape.
Torch held too close or too stationary. A stationary torch burns individual peaks black while leaving adjacent meringue untouched. Keep the torch moving continuously 5–8cm (2–3 inches) from the surface for even, golden caramelization.
Storing Tips
Unfilled shells: Store in an airtight container at room temperature for up to 5 days. Re-crisp in a 350°F (175°C) oven for 3 minutes if they have softened.
Filling: Refrigerate in a piping bag or airtight container for up to 3 days. Re-whip briefly if it has firmed too much during storage.
Meringue: Use within 2 hours of making for the most stable, pipeable consistency. Refrigerated meringue weeps and softens — make it on the day of serving.
Assembled cannoli: Consume within 20–30 minutes of filling. There is no practical storage solution for assembled, filled, torched cannoli — plan the timeline accordingly and fill to order.
Conclusion
Lemon meringue pie style cannoli prove that the most exciting desserts happen at the intersection of traditions — where the crunch of Sicily meets the tang of a French-American classic and produces something that is entirely its own. Crispy shell, bright lemon mascarpone filling, cloud of toasted meringue — each element technically accomplished, collectively extraordinary, and achievable in under an hour.
Make them and share your results in the comments — tell us whether you made the shells from scratch, how the meringue torch went, and whether they disappeared before anyone thought to photograph them. Leave a review, share with someone who loves both lemon meringue pie and cannoli, and subscribe to our newsletter for more creative, technique-driven dessert recipes every week.
FAQs
Can I use store-bought cannoli shells? Absolutely — and for a 30-minute version of this recipe, store-bought shells are the practical choice. Look for shells at Italian delis, specialty food stores, or online. Ensure they are fresh and crispy — stale shells produce a disappointing textural experience regardless of filling quality.
Can I make the filling without lemon curd? Yes — increase the fresh lemon juice to 4 tablespoons and add 1 additional tablespoon of lemon zest to compensate. The filling will be slightly less intensely lemony and less jammy in texture but remains bright and flavorful. A high-quality store-bought lemon curd is the most practical solution if making from scratch is not feasible.
Do I need a kitchen torch for the meringue? A kitchen torch is strongly recommended — it is the only practical tool for toasting individual meringue rosettes on assembled cannoli. An oven broiler is not suitable as it would soften the filling before the meringue toasts. Kitchen torches are inexpensive and widely available and are useful for dozens of other dessert applications.
Why did my cannoli shells absorb oil and become greasy? Greasy shells are caused by oil that was not hot enough — below 340°F (170°C), the dough absorbs oil rather than cooking in it. Verify the temperature with a thermometer before frying each batch and allow the oil to return to temperature between batches.
Can I make these ahead for a party? Yes — with a staged approach. Fry the shells up to 5 days ahead. Make the filling and meringue the morning of the event. Fill and torch to order immediately before serving. This staged approach makes the recipe entirely manageable for a large group with no day-of stress beyond the final assembly.
What if my Italian meringue deflates after piping? Italian meringue is significantly more stable than French or Swiss meringue and should hold its piped shape for several hours at room temperature. Deflation after piping is caused by under-beating — the meringue should be beaten until completely cool to the touch, which typically takes the full 8–10 minutes at high speed. Under-beaten warm meringue deflates within minutes of piping.